
Ever wondered how to get those luscious layers of long fluffy fur on your needle felted animal? more importantly how can you get them to look natural and stay put!?
Whilst making a badger I took some photos of him along the way to show you. It is fairly simple to do but does take quite a long time although once done it does give you a real sense of satisfaction and the fur really does feel soft and fur-like. Of course the end result texture does depend on the type of animal you are felting and the type of wool you wish to use.
If you are new to this amazing art form then before you get started – check out my tutorial ‘what is needle felting’ for basic needle felting techniques.
What wools to choose?
For my needle felted badger I had already made his body shape by sculpting with natural carded wool. I recommend wool batts which come in long thick sheets, making it easy to pull sections off and the wool is really fast to felt with.
Then for the top coat (which I will be demonstrating in this tutorial) I mixed grey and black merino wool tops with a few strands of some natural undyed wool tops for a rich cream colour. I particularly love the merino sheep wool as it comes in a variety of animal colour options and is lovely and soft to touch. Natural wool tops in breeds such as Jacob or corriedale are quick to felt and are a little more fibrous to the look and feel. When using wool tops the fibres all lay in one direction so they are perfect for cutting lengths and adding these to resemble long fur on your needle felted animal. If you would like to you could use other luxurious fibres such as baby alpaca.
What tools will you need to attach the fur?
Very simple you just need:
- barbed needle/s – I would recommend 38G Star Needles or 40G Triangle needles.
- a felting base e.g. a basic foam pad, a wool mat or a rice bag (see how I make one here).
- small scissors (I just used nail scissors but you could get some really cute stork embroidery ones for your projects – really sharp and useful for trimming long fur)
- you can also use a small ordinary sewing needle to fluff up fur at the end.

NB I didn’t want to completely flatten my fur down but allow it to stand out with some volume so only used one needle at a time rather than a multi-needle tool and changed my needle depending on detail and thickness of wool being needled. .
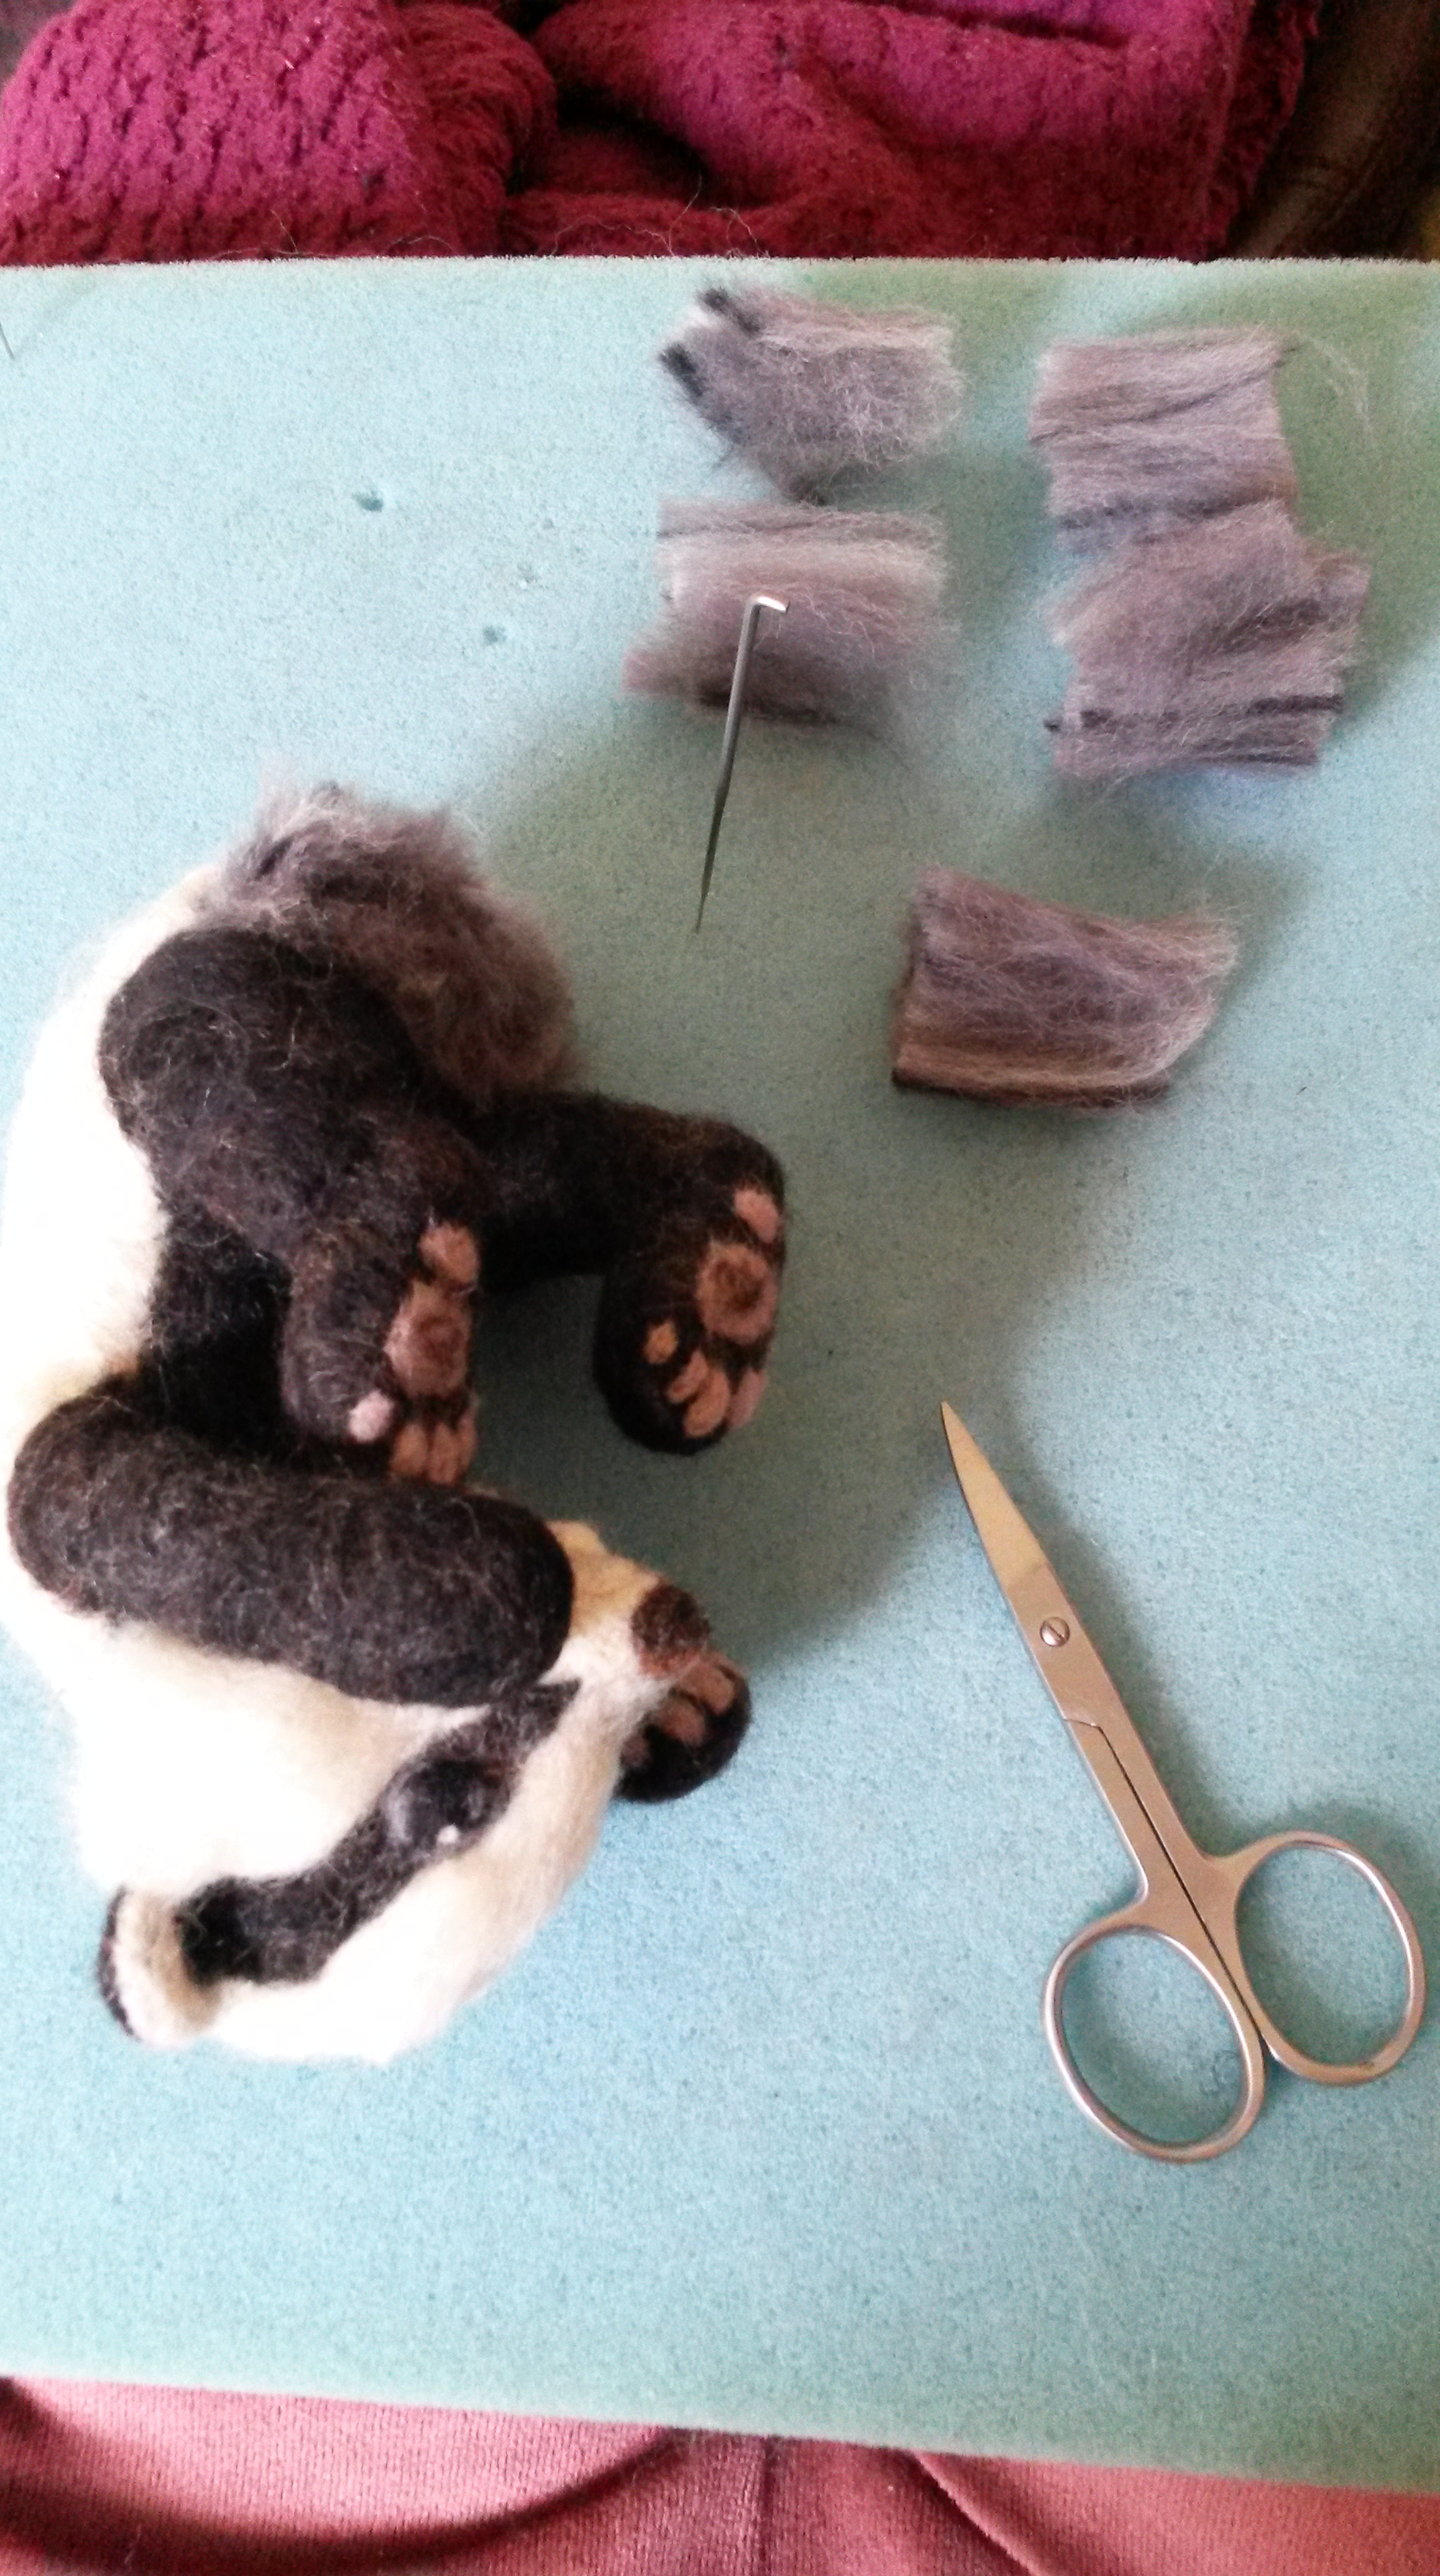
As you can see I have completed my badger except for his back fur and tail at this point. For how to make a badger head please see my tutorial here.
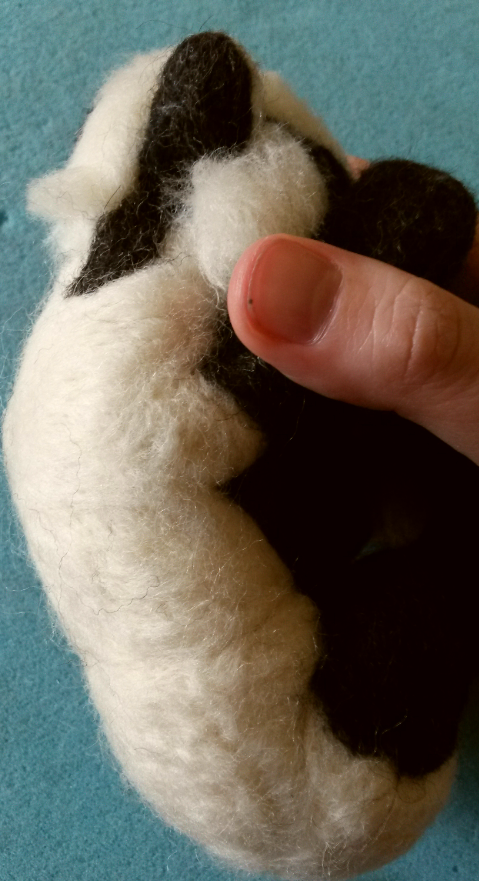
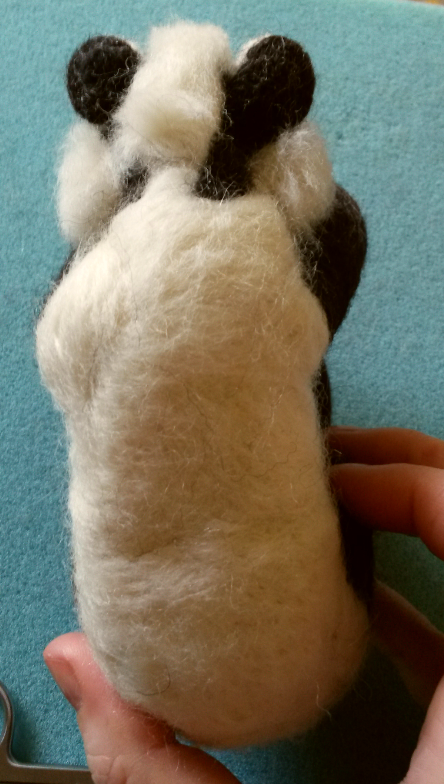
I love the fur on a badger’s back, it is greyish in colour but with flecks of black, brown and cream.

Now you could use carding brushes or dog brushes to blend the colours of wool but I wanted to keep the fibres all going in one direction as much as possible at this point and with block strands of full colour in black / cream / grey so not fully blended.
To achieve this lay lengths of each colour on top of each other and then using your thumb and first finger of each hand at each end of the wool lengths, pull your hands apart pulling the wool away from each other. Lay each layer again on top of each other (fibres all in same direction) and keep going until all the wool is blended as much as you want it to be.

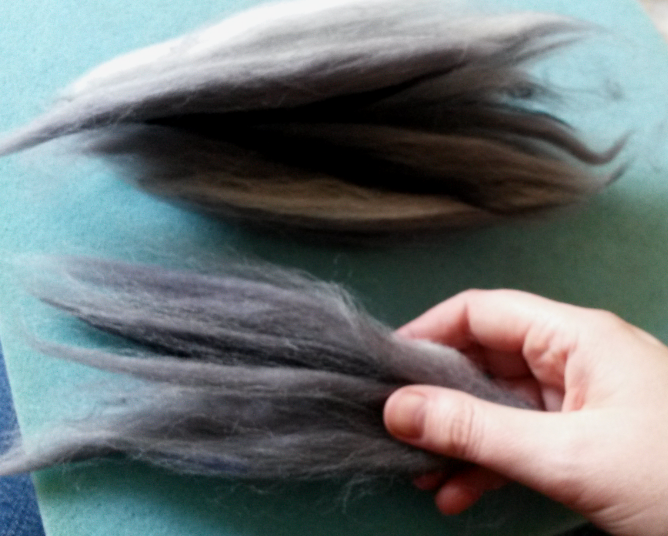


Then take narrow strands of the mixed wool the width of one or two fingers

… and cut these into small pieces, roughly the same length. The length will vary as we felt as some areas will have longer fur than others…

They don’t need to be perfect as no badger will have its own hairdresser with a perfect hair cut. 🙂

I will now demonstrate what you will do with each piece..
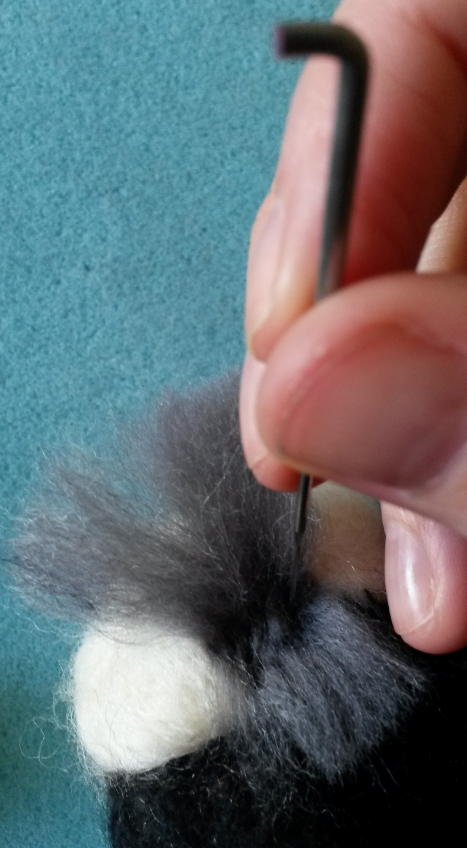
Take a piece and slightly pull in the centre in a bow-like shape

To layer the fur we need to felt from the back end of the animal layer over layer until reaching the head… so place the first piece at the very bottom of the badger’s rump.
Felt using your barbed needle along the centre parting of the wool piece in various directions, the depth should go down to the first few barbs but the aim is to felt shallow but in many directions for the wool to stay put.


You can also felted slightly below the centre line onto the bottom half of the piece to ensure it is in place.
Now carefully pull down the top section


… and ensure there are no stray edges by encouraging the wool in from both sides..
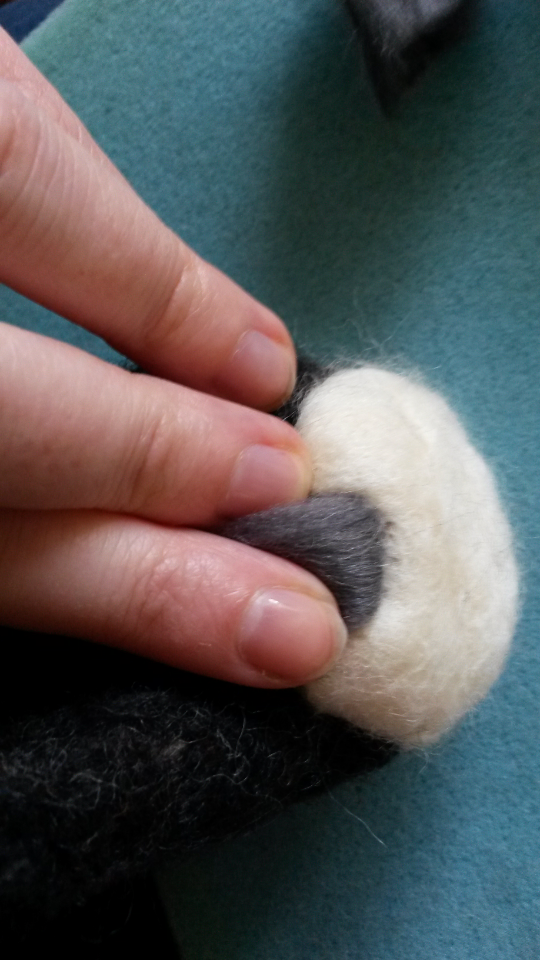
Now felt along the top folded edge until it is firmly in place.
Felting along the centre and then on the top edge in this way helps the wool to stay in place. Give a tiny tug to check it doesn’t easily pull out. NB a really good tug will likely pull fur out hence why these cute little animals are not meant to be toys to be pulled around…they should take cuddles and some handling though so ensure you felt well.
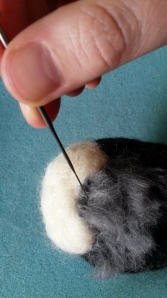
Again ensure you felt in many directions and then continue on to the next piece…layering the wool to create a fur look..


When moving up to the next layer, position the wool just above the last layer – you don’t want gaps in between of core wool showing so don’t leave too big a gap…


Don’t worry about the fur being too long or tufts sticking out, as you can give the end of the fur a trim as you go (time to use your hairdressing skills :-))

By the way this doesn’t need too much skill and I am definitely no hairdresser, just trim in various directions for a more natural fluffy look.

Any bits you trim off can be used for other felting projects or even for any areas you wish to fill in later at the edges so don’t waste them just put aside in a neat pile for later..

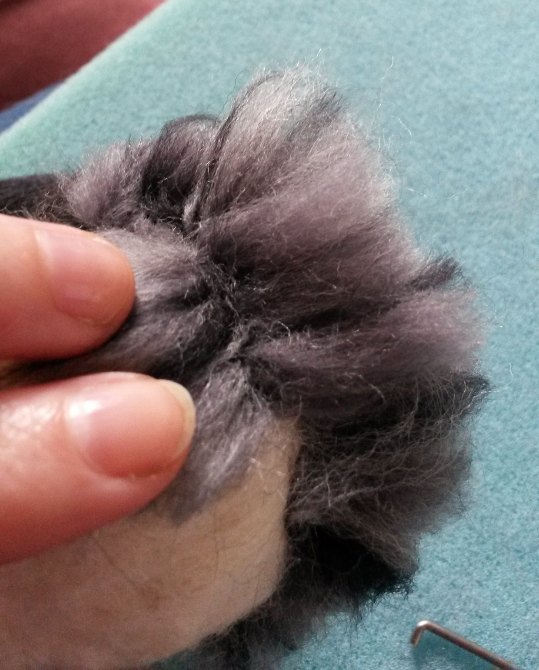
Optional; For the back end of the badger I wanted this to be extra fluffy with the fur standing up slightly on end so to achieve this, run fingers through the strands of wool to fluff up and stab the wool all over between the strands, not to felt down but to fluff up…(

As you can see we have a way to go but we are on our way !!
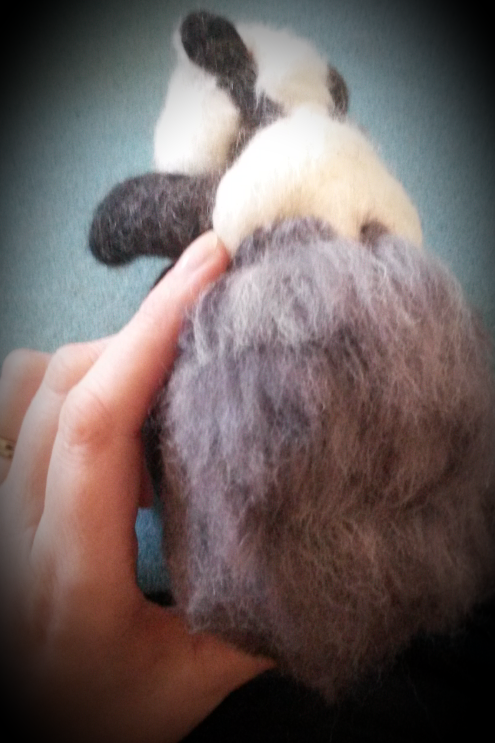
Aw look at him waiting so patiently to be finished 🙂

You may find it easier to turn his body as you go – work with whatever position you find comfortable and whatever means less squishing of his cute little nose into the felting mat..

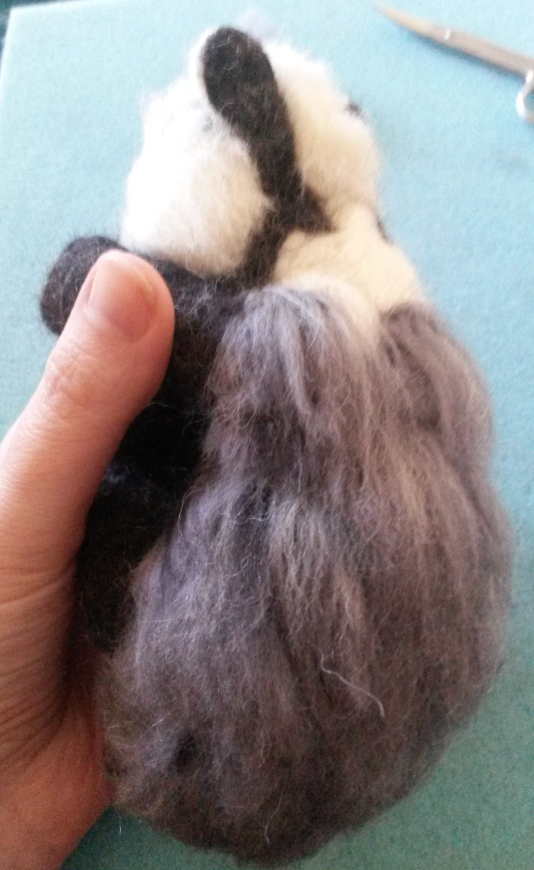
As you reach the main length of his body you may now decide to cut the lengths of wool a bit longer

For a more realistic look vary the colours so that you sometimes get more black or cream in the strand you felt…mix it up a bit..

Keep going…


Almost there… take a breather – have a hot chocolate !!

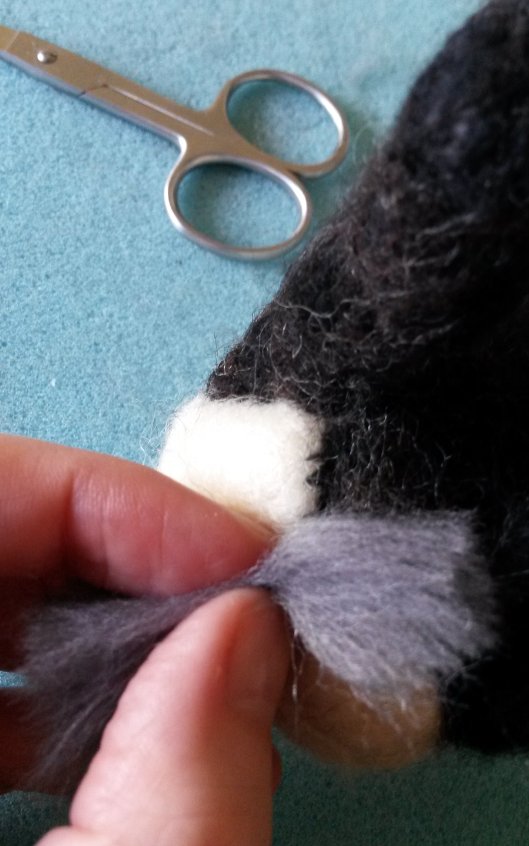
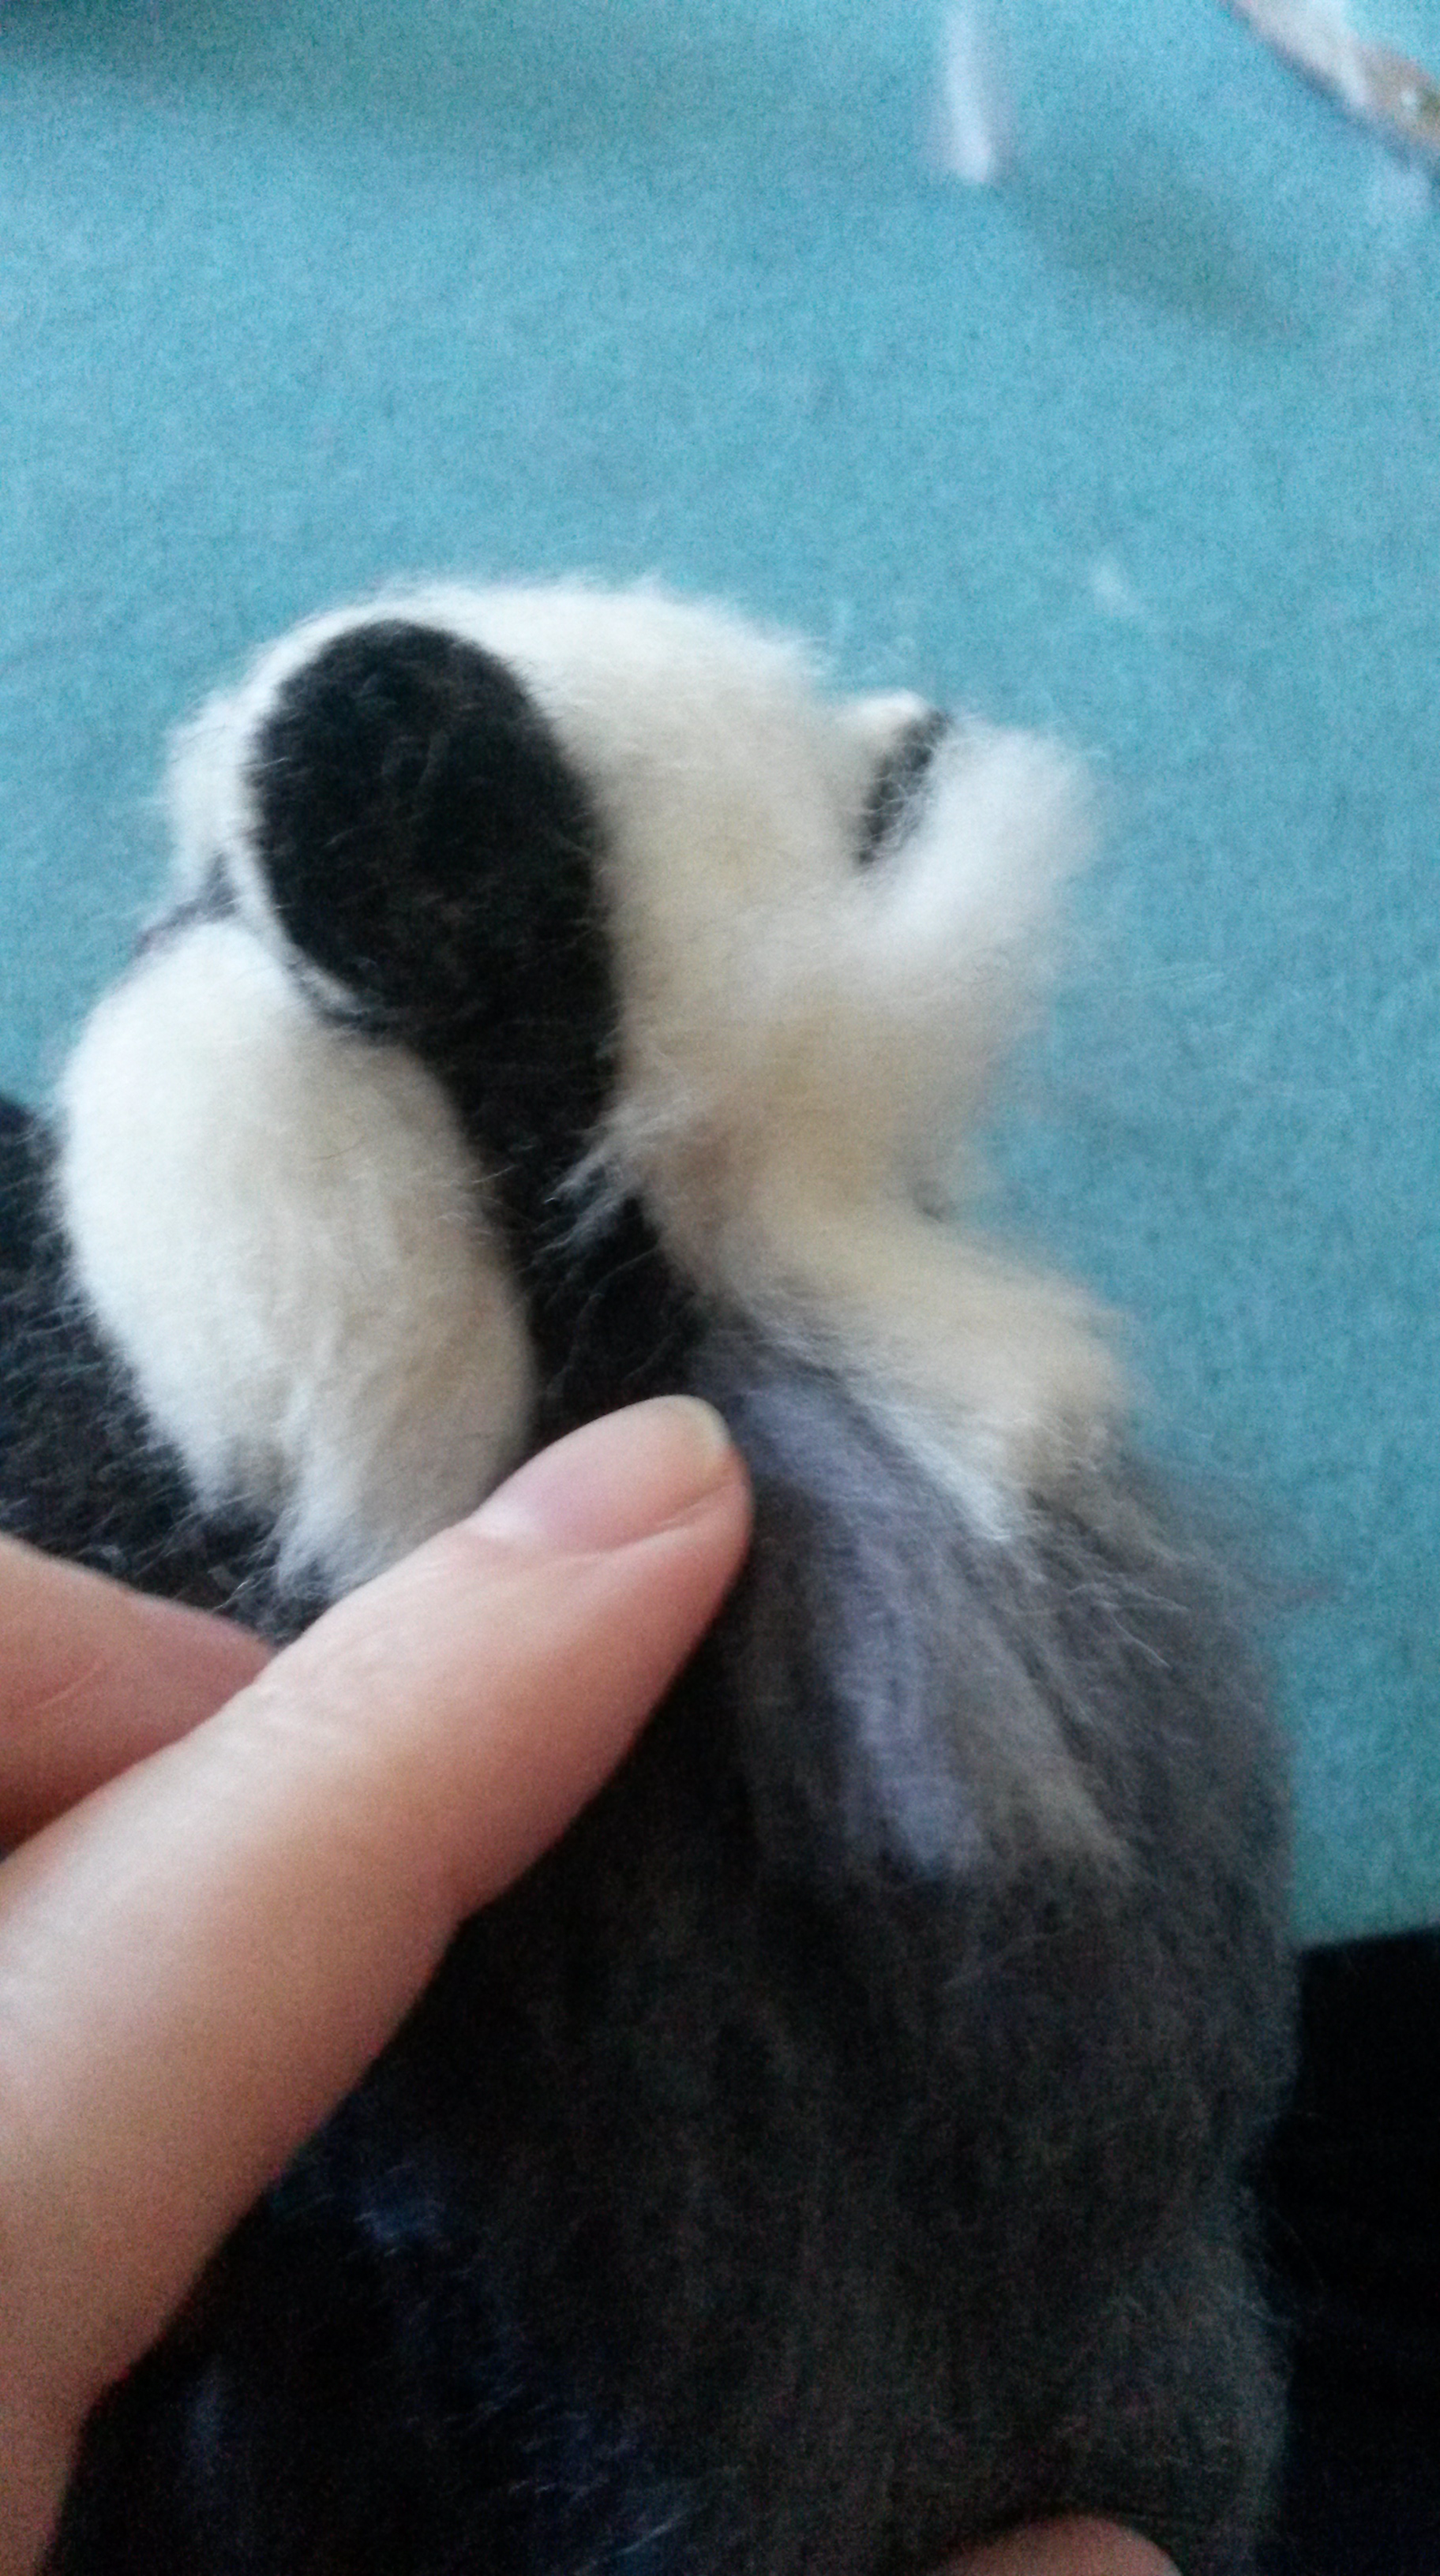
Specifically for the badger- when reaching the neck line, overlay some strands of black wool at the base of the ears …

Then finish off with some more of the cream at the base of his head..

You can use a normal sewing needle now if you wish to carefully fluff up the fur where it may have flattened slightly..
And there you have a gorgeous badger! fully furred waiting to be cuddled and fit to be loved!!

I added his tail after this which also had several layers of wool as fur…
Here he is all completed !! so playful !!

Long Animal Fur video!
Find it easier to learn by watching how it is done?
 My ‘Long animal fur’ video tutorial is NOW AVAILABLE on my YouTube channel in 4 parts.
<<<Click the donkey picture to start watching part 1
You’ll learn even more techniques for adding long fur (as demonstrated on this adorable miniature donkey).
Did you find this tutorial helpful? What would you like to learn about next? Please leave comments. Why not post a photo of your own creations?
Don’t ever miss out on my latest tutorials! Insert your email address and click the ‘Follow’ button on the right hand panel to receive notifications of when the next post is up..:-)


What do you use for the base of a mask? I loved you animals and are an inspiration. Trying to do monkey that has a mixture of long and short. Trying to figure how to do structure. Thanks donna
LikeLike
Hi Donna, thank you. Sorry I’m not sure what you mean by mask? If you mean the core of the animal before the long fur then I often felt a very firm /medium firm core wool before adding the fur. Corriedale batts or slivers are good for this. Some animals that are stood up eg a dog or donkey stood on all 4 legs then I use a wire armature with wool wrapped over the wire. The wire gives stability. Does this help?
LikeLike
Thank you so much for making this so easy to follow! He is beautiful!! Maybe one day you can tell us how you made the bads on his little hands and feet! Thanks again , have a blessed day!!
LikeLiked by 1 person
Ik ben begonnen met vilten en ben bezig met een Schotse koe en die heeft lang haar. Heel hartelijke dank voor de prachtige uitleg. Trouwens alles is heel goed uit gelegd en zet aan om meer te doen.
LikeLike
Nicole, dank je. Ik ben zo blij dat deze tutorial nuttig is.
LikeLike
Pingback: How To Needle Felt Long Animal Fur – Felting – Mix Of Tips
Pingback: How To Needle Felt Long Animal Fur – Woolnose
Excellent Thank you for sharing!
LikeLike
Hi, I have a question. I am felting a maine coon cat. How should I do the long fur coming at the side of te face? I can not fold it because it would show… what should I do?
LikeLike
Hi Carla, the main thing is to get the wool to stay and felt into the base. If you take much thinner sections of wool you can still fold them. If this doesn’t work then place the end where you wish to fix it and go at it with the needle in many angles as possible.(I often move the needle in circular movement to tease the fibres into the base at different directions before stabbing)You can also take the tiniest fluff of extra wool laid over the end you wish to fix for extra reinforcement. Tug the strands gently every so often to test when it is secure enough. I hope this all makes sense? Not so easy to explain without showing you. My video tutorial may also help if you are looking for ideas on technique. Would love to see your Maine coon cat. They are adorable. Let me know how it goes. Amanda
LikeLike
I will, and thank you for the advice. It is great to see the pretty things you make. Love to see more.
LikeLike
Thank you for the info and insight! I am so frustrated ! I recently started needle felting ! And I’m trying
To make a miniature pomeranian for my dollhouse
I see so many amazing ones on Pinterest
But oh boy … mine looks nothing like those !! I wish
I could get a tutorial on a Pom ! It’s crazy ! I guess I shall keep practicing ! Any thoughts?
LikeLike
Thank you! This tutorial was very helpful. I am just new to this art/craft myself, but I really love it! I’ll be examining your website for some time to come!
LikeLike
Que maravilla tus tutoriales Estoy aprendiendo con ellos Vivo en Uruguay America del sur y aqui no se hacen talleres de fieltro muy pocos Se han hecho pocos pero fietro mojado En mi pais no se usa el fieltro Yo quiero aprender agujado para hacer cuadros Graciad por lo que enseñas por internet Todo genial Susana
LikeLike
Quiero comprar un tutorial, pero a URUGUAY NO llegan, podria comprar tutorial PDF, cuato sale y como pagarlo
LikeLike
Hi. Thank you so much for sharing. I’m just getting started with needle felting, and I’m so excited to find folks like you who are willing to share their knowledge.
I recently saw a post on the internet where the artist made a hedgehog with what looked like a prickly fur backing. Would you have any advice on how that was done or have you done it yourself? I haven’t had time to look through all of your post, but was so in love with this hedgehog, I thought I would ask. Thank you.
LikeLike
Thanks Donna. I will also be selling a video in the near future on long fur. I haven’t tried a hedgehog yet. No doubt I will at some point. I believe people use mohair fabric that you buy and cut to size. There is some on Etsy. Maybe search for hedgehog mohair fabric though elsewhere as it looks fairly expensive on Etsy. I would prefer to try a way to do this myself though if possible. With the pre bought one I assume you would see or stick the fabric to the rest of the hedgehog you have felted. Let me know how it goes. . 🙂
LikeLike
Love these little animals and would like to learn how to make them…where can I find directions on how to make them and materials needed?
LikeLike
I can’t begin to tell you how helpful this is. Thank you .
LikeLike
So pleased it helped Linda. I am making a video at the moment to show a donkey with long fur. So watch this space
LikeLike
Thank you! This is brilliant. Given me lots of ideas.
LikeLike
Glad to be of help 🙂
LikeLike
do you ever srart felting an animal but end up with another one by mistake because it just didn’t ‘ t look right? I started with felting a guinea pig and ended up with a shi t,u!!¡
LikeLike
Hi Carolyn. Heehee I haven’t so far but can see how it could happen 🙂
LikeLike
Love your tutorials! I have a niece who adores badgers. I’d love to try felting one,
LikeLike
Thanks 🙂 have a go. The badger was fun.
LikeLike
Thankyou for sharing your knowledge. Brilliant tutorials I’m a begginer this is so helpful
LikeLike
Thanks Ann. Hope you are enjoying your new found hobby 🙂
LikeLike
Maravilloso, que artista eres Gracias por tu tutorial desde Uruguay Susana nunca he hecho animales , voy a intentar
LikeLike
Gracias Susana 🙂
LikeLike
Wow…never felted before, never knew it exsisted. I’ve been pinned lots of pictures and yours is the 1st site that I finally catch on how its done.THANK YOU. Although I love all the feltting I want to do the little animals. So thank you for making my desicion to delve into it very easy.
LikeLike
Aw thank you. That means so much to know my blog helps others. Hope you have lots of fun felting. Let me know how you are getting on 🙂
LikeLike
Also, is it worth adding wool noodles! Using wool noodles to act as a staple for your longer fibers, ie in the middle of the length of felted wool?
LikeLike
love it!
LikeLike
I love your tutorial. So easy to follow. And the inlay of a pause with hot chocolat is lovely.
LikeLike
Thanks Kirsten. yes i do love my chocolate. can you you tell? 😉
LikeLike
Hi there Nancy
I luvv your work but, how do you. Get the animal shape?
Also, can you wire the animals to look more realistic if do do you know how.
Thanks for any advise
Deb
LikeLike
Hi Debbie, Thanks for your questions. I generally start off making basic shapes from core wool (cheaper wool that felts quickly eg corriedale); egg shapes, round balls, long tubes etc, felted fairly soft to start with and then add more tufts of wool and keep stabbing with the needle for many hours until I get the shape i want. I use photos of real animals as well as anatomy sketches as a reference. Sometimes i use wire to get the shape of hands and feet but you can also start off the whole animal as a wire armature (by bending pieces of wire into shape like a skeleton). I did this for the fox and cat, wrapping wool over the wire then adding wool to build the layers of shape. Once i have the shape of the animal i add ears, nose etc and finer detail eg eyes with some of my coloured wool eg merino(as this is very soft) then add stands of wool as fur. Wire gives some pose-ability depending on the strength of the wire. There are lots of YouTube tutorials out there to show how to do wire sculptures. Anyway hope this helps. from Amanda
LikeLike
Thank you for your help Amanda
Debbie
LikeLike
Excellent tutorial! I was very impressed with the way you had captured the shape of the badger to start with too. I now feel ready to have a go at using cut lengths of wool for some animals to get the bristly look.
LikeLike
Thanks Dawn, glad you have find my tutorials helpful. Thanks for the comment about the eyes too. Now i know how to do long fur I find it hard not to do the fur like this for most animals, even when the fur is fairly short it looks so much more realistic when put on bit by bit and then cut to the right length. Let me know how you get on.:-)
LikeLike
thank you so much for the great tutorial. I have just started felting but wondered about how to do this and what kind of wool to use. I will definitely try this soon
LikeLike
What a lovely informative site this is, I have just started needle felting and enjoy the tips this little badger would be a great gift for my hubby who is a devoted conservationist would I be right in thinking that the body is anegg shape or similar to the guinea pig.
Regards
Gail
LikeLike
So it appears as though my mistake has been trying to make this work with craft store wool! I am new at this art and am loving it! But the fur has been a stumbling block this week. Thanks for the post! Now to find a good source for different longer, silkier wools… any advice?
LikeLike
So it looks like the key is the type of wool you use for longer fur, is that right? I was trying to add long fur to a Gordon Setter and it just looked matted. I have just started learning to felt and have only ordered basic craft store wool and I have the sneaking suspicion this is the issue! Your tutorial was wonderful, thanks!
LikeLike
Thank you so much for sharing this method! I couldn’t figure out a way myself, and your tutorial is very helpful and easy to follow.
LikeLike
and another thank you so much.like wise just could nor figure this out. now that you have shared I wonder why I could not figure it out. |Thank You!!
LikeLike
Thank you! I’ve been trying to do this and your instructions were perfect. I was finally able to put locks
on my wooly sheep!
LikeLike
Fab! so pleased it helped. what sheep breed did you do? and what wool did you use? Possible to see a picture?
LikeLike
This is great!! I too just started. Two animals down and I’m excited to try one with long fur!! Thanks so much for this. Great instructions and pix!!
LikeLike
Ooh what animal will you try? Glad you found it useful 🙂
LikeLike
Amazing! How are the feet done?
LikeLike
Thanks Elizabeth. For feet see my blog post on tiny feet and toes. For my badger I just added small blobs of wool as the underneath paw pad details.
LikeLike
Thank you Amanda for giving me inspiration. I have been trying to teach myself but your tutorial has helped me such a lot.
LikeLike
Great tutorial just started needle felting 2 months ago and I love it ! This was easy to follow and understand thankyou
LikeLike
Thank you Linds. Nice to get feedback 🙂
LikeLike
Thank U so much. I’ve just sarted needle felting & i’ve a problem of how to add long fur. Your tutorial helps me a lot . Thanks again for sharing
LikeLike
Hi Noor, so glad you found it helpful. Thank you for your feedback.
LikeLike
Thanks for sharing this technique. I have just started needle felting and am achiebing some good results by watching tutorials online to get to grip with the basics. I was really keen to find out how to add long hair for my next prroject and your instructions are perfectly easy to follow.
LikeLike
Thanks 🙂 That’s great to hear. Please do share a pic of what you make. Always happy to hear from other felters. Good to inspire each other with ideas and tips 🙂
LikeLike
Thank you so much for this tutorial! I’m a self taught felted and have been making a lot of felted mice for Christmas. I’ve seen a lot of felted animals with longer fur on Pinterest but wasn’t sure how to start. I appreciate your sharing your secrets with us 🙂 the badger is beautiful!!
LikeLike
Thank you Nancy. So nice to be in contact with other felt enthusiasts. Let know if you would like to know about how I do other techniques. I am just learning myself and it really is so much fun! Will post about doing eyes soon too. 🙂
LikeLike
I am really new to felting because honestly I just discovered it. I make Native American dolls (no taller than 12″) and use black merino wool roving for the ‘hair’. I want to make two dogs. One like my own dog and one like my son’s dog. They both have longish hair and I was wondering how I was going to achieve that look. After reading your tutorial I now know and really appreciate you posting it. Thanks!!
LikeLike
That’s great to hear. Glad it helped to make your dogs 🙂
LikeLike