“How do I make a rice bag to use as a needle felting base?”
I have been using a blue foam pad since I started needle felting (as featured in most of my tutorials) which has been really great to use but I am finding that tiny bits of blue do come off of it now onto the piece I am working on and fibres tend to stick to it and the whole thing is looking a little fluffy, holey and worse for wear. After looking at alternatives for a needle felting base on the internet I came across a rice bag. Many claim it to be hard wearing and perfect for 3d sculptures. I didn’t want to pay the earth by ordering one on line and so for my birthday my mum kindly sewed one together for me from an old cotton bag. I added the rice this morning and finished it off. It is approx. 14 by 9 inches in size. So here’s how you can make one too; 1) Take an old rectangular cotton/burlap bag – I have several of these at home and usually use them for my shopping. You could pick one up from a charity shop, or buy one from a cheap store /supermarket. If anything like this one it’s probably best to give it a good iron before you start sewing 🙂 Best to use a plain one or one with a nice pattern you would like to show off. This one had a boring motif so this was hidden from sight once sewn. The weave should not be too tight but wide enough to allow the barbed needle through. You may need to test what you feel happy with. 2) Fold the bag in half, unpick the handles and remove. You could leave handles if you wish to hang it up. By folding the bag in half it will be double layered so it will be long lasting. The size of the bag should just be right but with this one my mum picked the thread from the top side too to allow an extra inch width. 3)Sew the edges by hand or by machine, stitches should be close enough to prevent any rice grains from coming out of the bag. Ensure the corners are well sewn by double stitching to reinforce. Simple back stitch is fine. Leave one end open for adding your rice. Turn inside out so stitching is on the inside with a neat edge. 4) Measure approx 1.75 kg of rice. I used cheap long grain rice. Pour into the bag using a funnel or jug (you can do this straight from the bag but mine tend to spilt and rice goes everywhere). You can choose more or less rice depending on personal preference. This amount comes to almost three quarters of the bag when holding the bag upright like a sack. If you fill it too much it will be very heavy and not lay right for a flat felting surface. Too few grains and the surface will dip. 5) Before sewing up completely, lay your bag out as you would use it to check you have the right amount of rice. You should have at least a good inch depth for the needle to go through. Then sew up as neat as you can. And there you have a rice bag!!! Simple!!! 🙂 I have to say I am loving it already. It feels different to my old faithful foam pad but I am quite liking the sturdy feeling of it and it looks like good quality and long lasting. I may not carry this one around as it is fairly heavy and I have soon found my needles don’t stay put for too long if I stick them in the bag like I used to with my foam pad, but then I sometimes break my needles from being lazy and not putting them back where they belong so that may be a good thing. Hope this inspires you to have a go and make a quick simple bag for yourself… Hmmm looks like my headless cat is pawing at it and enjoying the new feel too 🙂
“So, I just about know how to needle felt a cute fluffy animal but how do I even start to needle felt its eyes? How can I make the eyes look 3D, shiny and realistic and not too cartoon-like?’, I could use glass or plastic eyes but would love to use wool so that my sculpture is totally needle felted- so what do I do?”
This photo tutorial will hopefully show you the basics of needle felting animal eyes and give you some ideas along the way too.
Adding the eyes to any needle felted piece is actually one of my favourite parts. It brings the animal to life and gives it its soulful character. Getting the eyes just right shouldn’t be a stress! it can take some practice but it can be so rewarding adding that final detail to your newly created animal…
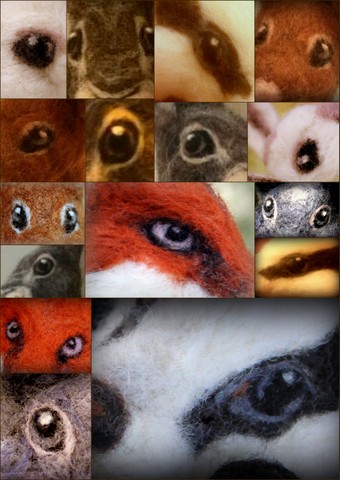
Here are some of the eyes I have needle felted so far to give you some ideas.
Can you work out what animals they are?
So here is how you can get started…
Step 1: Look at photos of eyes and get to know basic eye anatomy
Of course eyes are different for every species so the first thing to do is to take a look at photos of real animals to see how big the eyes are in proportion to the animal’s head, decide on colour, the shape, note where the light reflects etc. You don’t want to make the wrong sort of eyes for your animal (eg a cat’s eye on a mouse for example). I usually just do a web search and bookmark the pictures or pin them on pinterest to refer to whilst I needle felt.
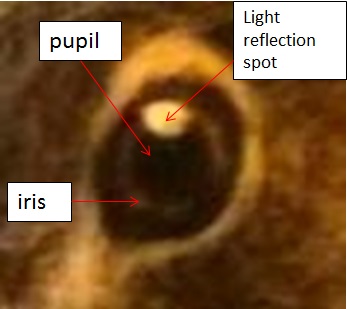
Remember doing biology? well you don’t need to know full anatomy of the eye but knowing your basic parts does help. Here is an eye of a needle felted hare I made;
You will find that most animals will have a pupil which can change in size depending on mood/ light exposure. For some it will be round or it can be different in shape e.g. a slit for cats and reptiles, square for a goat, even w-shaped in a cuttlefish!! Some have a distinctly coloured iris, some have eye lids some don’t- birds’ eyes face forward rather than sit on the side of the head… aren’t animals remarkable!
Step 2: Go for it
For demonstration purposes I will show you the stages that took place when making eyes for a mouse and then a badger. Eyes can be added early on or at the end, it’s completely up to you. I sometimes like to do mine near the end and when finished I can’t help but smile! 🙂
Some ‘Fit to be loved’ eye felting tips
use fine high gauge barbed needles for detail such as 40G or 42G
use warm hands to roll the tiny eye ball to keep rounded/oval rather than stabbing too much as this will just flatten it
it is easier to layer eyes parts on top of each other rather than try to make the exact shape (see what I mean below)
do each stage for each eye at the same time to get the eyes the same
measure using string/thread/fingers to check eyes are of equal size and symmetrically positioned
to attach eye to the head stab mainly around the edge of the eye in various directions rather than across the middle to keep the eye plump and prevent it from going too flat.
See below for instructions on the mouse and badger eyes. Note that I have also now created detailed videos on dog eyes and cat eyes if you would like to see those 🙂
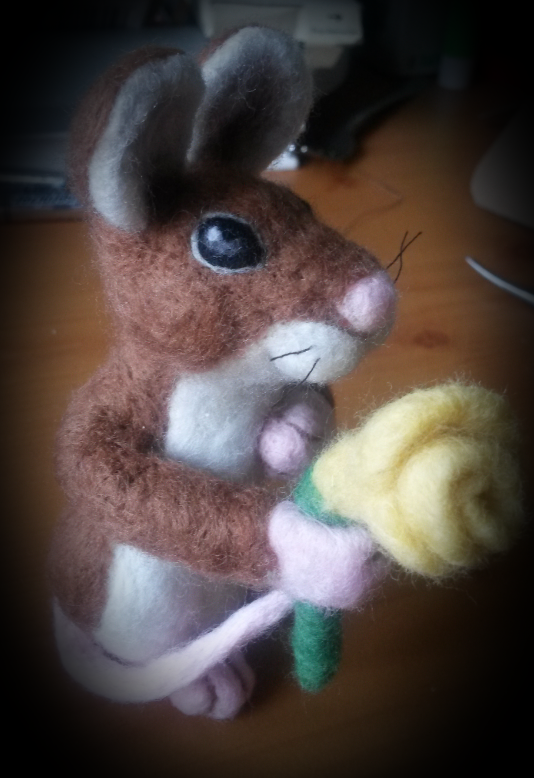
Mouse eyes (-basic level)
roll in warm hands 2 equal sized rugby ball shaped balls of black wool to form the basic eye shape. Lightly needle felt in different directions then place on the mouse head viewing from the top to check the positioning is symmetrical. The eyes on this mouse are simple to view as they contrast well in colour with the rest of its face fur.
firmly felt the wool into place by stabbing around the edge of the shape to keep the eye plump and not completely flat
use a smaller amount of wool for each of the eye irises (using a grey/green colour) and again stab them into place, being careful not to flatten the eye too much…
add a tiny ball of the black to the top of the iris to form the pupil. The position of the pupil will determine the way the mouse looks at you; for this little mouse the pupil at the top gives the impression that he is looking up. Ensure the pupils match in size and position on each eye (you don’t want him to look cross-eyed unless that is the expression you are after..)
adding the pupil in this way i.e. layering one circular shape over another is far easier and less tedious than attempting to shape the iris in a half moon shape and also gives the eye a fuller shape..
take a thin strip of cream-coloured wool to form the edge of the mouse’s eyelids (top and bottom) which nicely frame the eyes. View the eyes from the top to ensure they are in the correct position and of correct thickness
this is also a good time to manipulate the wool on the eyes as well as around the eyes with your fingers to make the shape of the eyes fit the face as best it can. For example you could pull in the bottom corners of the eyes and narrow the bridge of the nose slightly if you choose to do so or if one eye sticks out more than the other you can carefully push it in slightly.
as a finishing touch and to bring the eyes to life and make them look 3D and shiny, add a tiny dot of white to give the illusion that light is reflecting across the eye surface. The exact position of this is not so crucial as getting them in the same mirrored position for each eye…
Here is the finished mouse saying ‘I love you’ with it’s cute yellow felted flower…
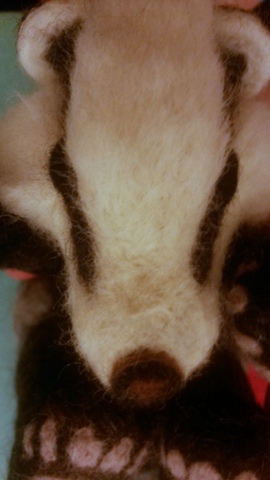
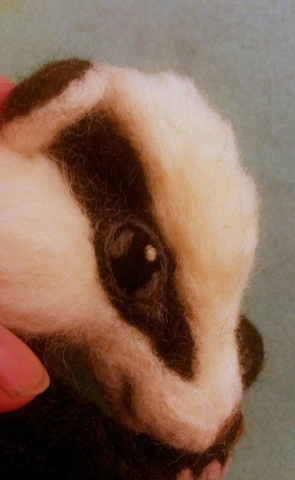
Badger eyes (- intermediate level)
The badger’s eyes are slightly harder to create. The reason being is that the badger’s dark eyes are hard to see on a fairly dark face so needing more careful measuring to ensure both eyes look the same. The eyes are mainly dark so need more help in making the surface look like it is shiny and reflecting the light. I also add colour to the bottom corner of each eye to form what is known as the ‘lacrimal caruncle’ that you sometimes see in mammals such as a badger (to make it look even more life like)
roll 2 small balls of black wool in warm hands and needle felt lightly in all directions
add the balls to the badger head, felting slightly to keep in place but don’t felt firmly until you have checked they are positioned correctly
whilst they are roughly in place view the eyes from above to check the position. As the background fur is very dark too, you may find this hard to do so you may wish to feel the eyes too to check this..as you can see the left eye was slightly higher at this stage so I moved the eye down slightly to match..
once happy with the positioning, felt around the edge of each shape, not across its middle, to ensure the eye does not become too flat.
take a thin length of grey wool for the top and bottom eyelid edges for each eye, these will nicely frame the eyes.
needle felt these into place and then view both eyes from the top to ensure they are in the correct position and of correct thickness
add a tiny amount of brown wool into the inner eye corners (the ‘lacrimal caruncle’) – this was the same colour as the brown detail on the badger nose
the eyes of the badger are very dark so as well as having a tiny white spot to give the illusion of a shiny eye as with the mouse, I wanted to add some grey to the sides of each black eye for extra 3D light reflecting effect.
it is very important to ensure that what you do with one eye is mirrored with the other so checking from all angles is crucial.
and add the white dot…
Yes these eyes can take a while to get just right but oh how cute do these badgers look when finished!!
Did you find this tutorial helpful? What would you like to learn about next? Please leave comments. Why not post a photo of your own creations?
Don’t ever miss out on my latest tutorials! Insert your email address and click the ‘Follow’ button on the right hand panel to receive notifications of when the next post is up..:-)
Don’t have time to make one but would love a one of a kind needle felted animal by Fit to be loved for yourself or for that special someone? Visit my Etsy shop today to see my latest creations. Or like my facebook page to see what I am making next.
My site includes links for where to source needle felting tools and materials. These are my personal recommendations and from my favourite suppliers who I trust and who have excellent reviews. Some are affiliate links so I may receive a small commission at no extra cost to you. This supports my website and enables me to continue to provide valuable content and for that I am so very grateful to you – Thank you!!


 2) Fold the bag in half, unpick the handles and remove. You could leave handles if you wish to hang it up. By folding the bag in half it will be double layered so it will be long lasting. The size of the bag should just be right but with this one my mum picked the thread from the top side too to allow an extra inch width.
  3)Sew the edges by hand or by machine, stitches should be close enough to prevent any rice grains from coming out of the bag. Ensure the corners are well sewn by double stitching to reinforce. Simple back stitch is fine. Leave one end open for adding your rice. Turn inside out so stitching is on the inside with a neat edge.
  4) Measure approx 1.75 kg of rice. I used cheap long grain rice. Pour into the bag using a funnel or jug (you can do this straight from the bag but mine tend to spilt and rice goes everywhere). You can choose more or less rice depending on personal preference. This amount comes to almost three quarters of the bag when holding the bag upright like a sack. If you fill it too much it will be very heavy and not lay right for a flat felting surface. Too few grains and the surface will dip.


 5) Before sewing up completely, lay your bag out as you would use it to check you have the right amount of rice. You should have at least a good inch depth for the needle to go through. Then sew up as neat as you can.
 And there you have a rice bag!!! Simple!!! 🙂
  I have to say I am loving it already. It feels different to my old faithful foam pad but I am quite liking the sturdy feeling of it and it looks like good quality and long lasting. I may not carry this one around as it is fairly heavy and I have soon found my needles don’t stay put for too long if I stick them in the bag like I used to with my foam pad, but then I sometimes break my needles from being lazy and not putting them back where they belong so that may be a good thing. Hope this inspires you to have a go and make a quick simple bag for yourself… Hmmm looks like my headless cat is pawing at it and enjoying the new feel too 🙂