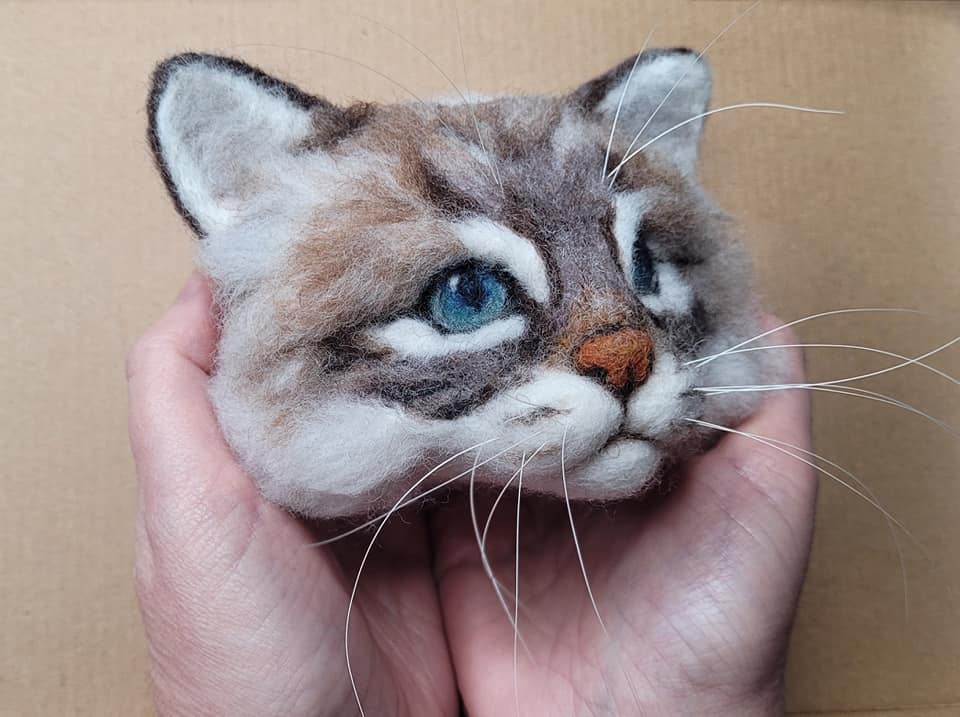
Wondering what to use as whiskers for needle felted animals? or maybe you would like to see what other materials are possible that you’ve never tried before?
In this video I compare 7 materials that can be used for whiskers so you can decide on the best one for you!
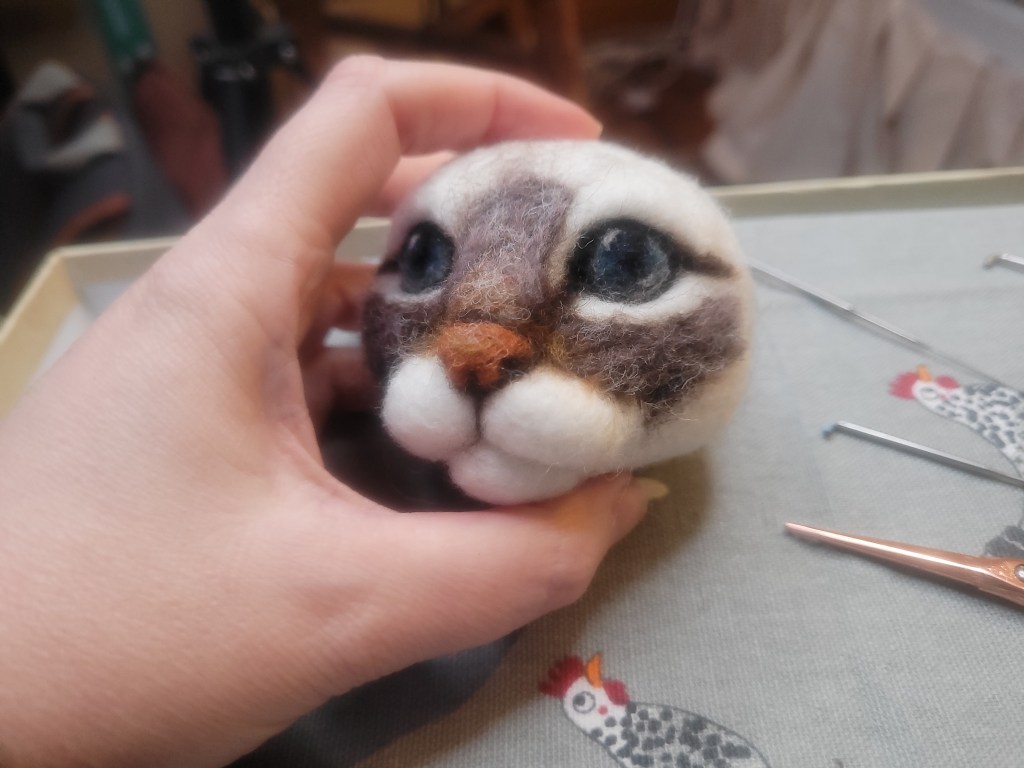
I demonstrate how to attach whiskers on my Tabby Birman cat head as this is the 5th and final part of the needle felted cat head series. If you haven’t seen the first 4 in the cat head series they are here.
I explain the pros and cons of the options and share my top 3 favourites.
Are you wondering how to get a smooth on your Needle Felted Animals?
In this tutorial I share my 13 Top Tips for how to get a smooth finish! No more holey, lumpy or fuzzy sculptures! Get stabbing and needle felt a smooth surface with confidence!
I include advice on the process, needles, wool, use of tools and much more! Look out for my extra FAQs (about long furred animals and reverse felting) at the end.
Do you prefer to learn by watching instead of reading? if so please do skip to the bottom of this page to watch the video on YouTube 🙂
What are you wanting to achieve?
Are you wanting to needle felt a short furred animal like a horse or short haired dog breed? or maybe you want to felt a part of the animal such as around the muzzle so that it’s smooth and soft?
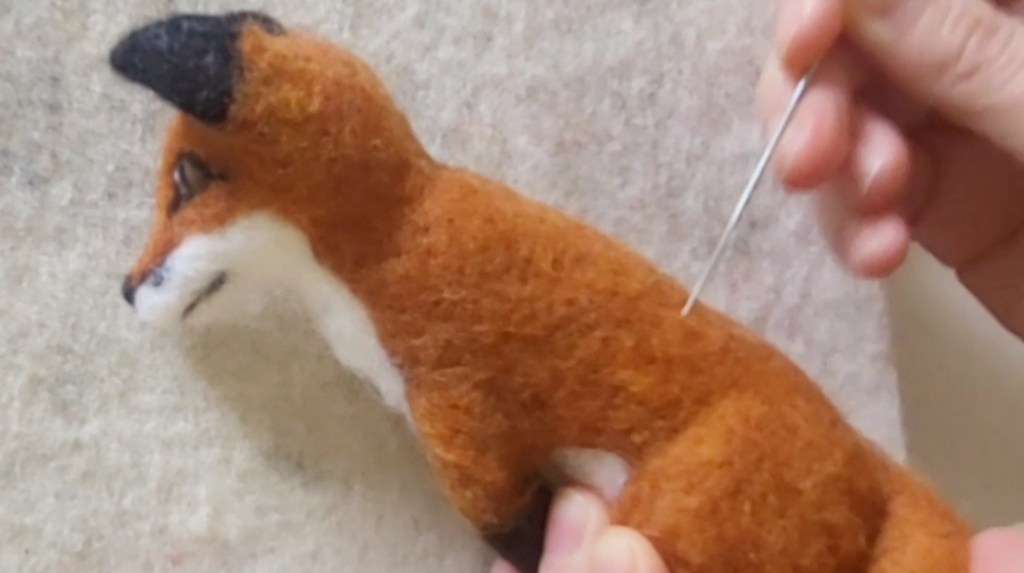
Or maybe the style of your sculpture is that you want it to look firm and no fluff but smooth looking, for example with my sitting foxes I made in preparation for an upcoming needle felting course, I wanted them to be quick and easy to make for my students without all the long fur attachment which can take hours.
Tip 1: It’s about the Entire Process!
Think of this in terms of it being about the entire process. It’s not just about the end result. You can’t grab your wool and stab it any old how and then expect a sudden smooth finish by the end. It is possible but it could take a lot longer to achieve. So start off really well, have intension and a plan! Through the process of stabbing, layering carefully and keeping it firm and using some of the other tips below you’ll hopefully end up with that lovely smooth finish!
Tip 2: Wool
It’s important to understand about wool and consider the type of wool you will use for your needle felted animal.
If using merino wool, this is soft and fine so is going to look and feel soft and smooth. Be careful though if using merino tops (tops are where the wool is in long lengths which go in the same direction). The structure can mean that stabbing will show holes so you need to use finer and finer needles for it to look smooth and it can take a while to get the result you like.
Carded Wool usually comes in batts (sheet) or slivers (long lengths). Carded wool is where there are short fibres that go in different directions so fibres will felt fast and you can firm up your sculpture much quicker but the overall look can be more messy and less smooth so you’ll need some effort to prevent fuzziness and not show holes.
If you would like to know more about wool. Here is my Guide to Wool
Tip 3: Barbed Needles
Barbed needles for needle felting come in different gauge numbers (thicker or thinner), the end you stab with comes in a few different shapes e.g. star, triangle, spiral, crown, and they have varying numbers of barbs. So it’s vital to know which needle to use at the different stages of the sculpting, firming and finishing process.
When starting off you’ll need a lower gauge number (thicker needle) and when you finish off you’ll need a higher gauge number (thinner needle). For example when making the core shape of my fox I used a 36G triangle, then after a while I moved to a 38G triangle to firm it. I then smoothed the surface with a 40G triangle needle.
Tip 4: Keep Stabbing
If you find that your needle felted creation is not firm enough and is therefore too soft when you squeeze it, or there are areas that are lumpy, then you’ll need to keep on stabbing!
If you keep stabbing and then feel some resistance as you stab into the wool with the needle you are using, then you’ll need to move up to the next number gauge needle e.g. move from a 38 to a 40.
When I am sculpting with wool I like to keep my shapes medium firm while I perfect their form. Once I have manipulated the wool with fingers and happy with the overall look, then I go ahead and firm up further and keep stabbing.
Tip 5: Even out any Dips
If you have continued to stab but the odd indent is still there in the surface of the sculpture (sometimes this can happen with core wool where areas are thicker or thinner) then you may need to fill with more wool to even out and smooth the surface.
Tip 6: Felt Shallow and at an Angle
Once you are using higher gauge needles to smooth the surface (e.g. 40G or 42G) these will leave very tiny holes compared to the lower gauge needles but make sure you also shallow felt by only felting with the thin end tip of your needle. Felting at a slight angle e.g 45 degrees and not stabbing at right angles (90 degrees straight down) into the wool also shows less holes!!
Tip 7: Spiral/Twisted Needle
Once at the stage to smooth your surface you can also use a spiral (also known as a twisted needle). This is a great needle for getting a smooth finish. When you look at the needle close up you’ll see that the end of the needle is twisted as a spiral, shaped like a mini drill.
Tip 8: Layering wool
When layering wool e.g. when adding a coloured layer of carded wool over core wool, avoid creating harsh edges and bumps in your wool by looking for and removing any unusual blobs or strands and vegetation matter before you add it. Also be careful to select the right amount of wool as a wad to lay so that it is not too thick nor too thin in thickness and the fibres are evenly spread. Lay it over your core base without folding edges then lay the next piece along side it but slightly overlapping.
Stab the wool with your higher gauge needle shallowly and at an angle as described above and you should end up with a nice smooth finish.
An extra Tip for Merino tops
A merino top can be more of a challenge to layer and look hole free – don’t worry if this is all you have in your supplies- it is possible but needs lots of stabbing with fine needles to finish off. Sometimes though I take the top and pull it apart with my fingers to shred it up into shorter strands and to ensure the fibres end up in different directions. Then I add evenly spread wads of this to my animal. It really helps with blending along any edges with another colour. Why not try it out and see what you think 🙂
Tip 9: Use Hands/Fingers
If you’ve used your fine and spiral needles and shallow felted at an angle but still seeing holes, others may not notice but maybe you do …. what do you do? Well it’s a simple thing but really works! Just use your hand/s or fingers to carefully rub over the wool surface! the warmth of your hands and movement will manipulate the surface and move fibres over any holes. Be careful not to do this too briskly as this can add to the ‘too much fuzz’ problem. You can roll a ball shape or long cylindrical shapes such as legs or tail of an animal between your hands with some pressure , you can rub large areas of the animal over a warm palm of your hand in a circular motion or back and forth, or rub a finger end in circular motion over patches of wool that need it.
Tip 10: Needle Brush
Another way to help cover holes is to use your sharp needle end (can also use a normal sewing needle) to carefully brush fibres. This is a tiny movement but can be really effective. You might quite like this look to add a little texture at times so more animal-like whilst still being soft and smooth to the touch.
Tip 11: A Tiny brush
If you have a soft tooth brush or baby brush or an eyebrow brush then you can also brush tenderly over the fibres to again move strands over holes. If choosing the eyebrow brush it will need to be one that has a bristly brush rather than a comb edge. I like to press against the wool surface with my brush and move in a circular motion a bit like I would with my fingers rather than actually ‘brush’ the fibres. Brushing or rubbing too vigorously will certainly create more texture and possibly fuzz the surface but this may be a look that you like too!
Tip 12: Scissors
If your issue is still that your needle felted animal looks too fuzzy, messy or there are stray strands then this is time to get out your small scissors and give it a really good trim. Sometimes though fuzz on an animal is a great look… this is the wonderful thing about needle felting and playing with textures. You can try both looks and see what you prefer!!
Tip 13: Super Smoothness Ideas
Using pressure and heat is a brilliant way to smooth down any fuzz and you can achieve this with your every day iron if you are careful or you could try a mini crafting iron over the surface of your small needle felted creations.
If you want sleek slim smooth animal ears or feathers (or other flat pieces you are making) then how about try some hair straighteners? you can lay your felted item between the plates for as little as 5 seconds on a fairly high heat and wow what a wonderful result! those stray fibres proper flatten down.
Bonus FAQs
1: What if I’m making a long furred animal, Does it really matter if the core wool is firm or smooth?
Well, you don’t need the surface perfectly smooth no as you won’t see it. However it is important to get the core of your animal firm and be free from any lumps or dips. If too soft then when attaching the long fur the animal core can shrink slightly, the surface may become uneven and the whole creation can become misshapen. If you start with a firm smooth surface the fur will layer nicely and flow well. If you’d like to learn how to add long fur to your animals there is a video series here.
2: What if I’m reverse felting? Does it matter about the wool being firm or smooth then?
Again it doesn’t need to be perfectly smooth but you need the wool firm with an even surface so that when you pull out the fibres with your reverse needle the wool maintains its stability and shape. You want to be pulling out even tufts of fibres that will look like fluffy fur not pulling out big chunks! If you’d like to know how to reverse felt, your ultimate guide to the reverse felting needle can be viewed here.
Here is the video version for how to get a smooth finish on your needle felted animals.
I hope you found this tutorial useful. What smooth surfaced animal are you making?? 🙂
‘How can I make cute paws for my needle felted animals?’
Here is a quick and easy needle felting for beginners video tutorial.
You too can make simple felted animal feet.
I demonstrate how to needle felt kitten paws but this can be adapted for many other needle felted animals for example a puppy, badger, hamster, bear etc.
There is no need here for a wire, you just need your wool and needles!
In this tutorial I create the simple back foot shape from core wool, cover it with soft merino tops, then use my twisted needle to smooth the surface.
Next I add some black lines to define individual toes, add some cute pink paw pads (or toe beans as I like to call them)
and also give recommendation for how you would attach your animal feet.
So let’s jump to the needle felting paws/feet tutorial. 🙂
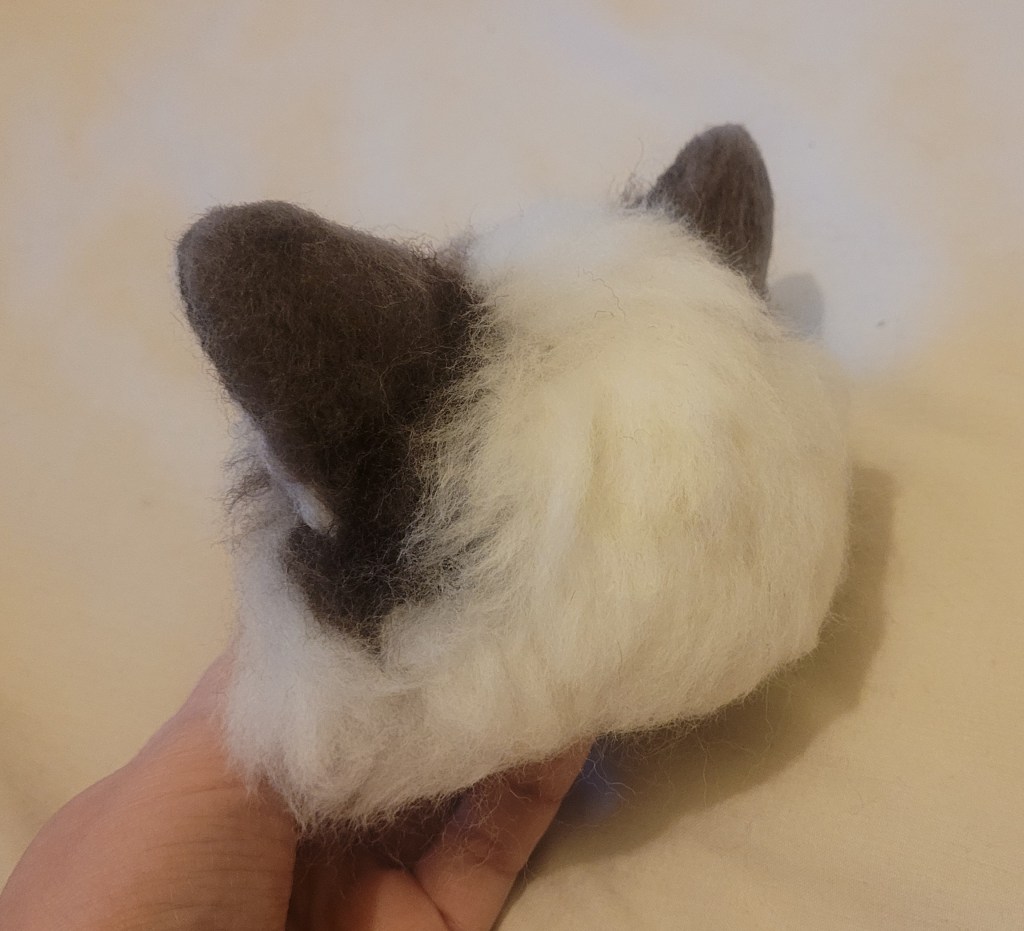
How do I needle felt realistic cat ears? What’s a Henry’s pocket? How do I add ear hairs?
These are the questions you might ask yourself, though maybe you have seen that interesting looking crevice/pouch on the side of a cat’s ear but not realised it was called a Henry’s pocket…hehe I didn’t know this until I studied the ears in detail when making my Tabby Birman cat 🙂 such a cute name for it don’t you think?
So here is my Needle Felting Cat Ears tutorial that will show you how to make cat ears from wool that are realistic and detailed and I’ll hopefully answer those questions more fully..
There are 12 steps including the basic ear shape, adding some inner ear colour, 2 methods for the fluffy fur on the back of the ears, how to create a Henry’s pocket, making the ears thin, attaching to the head and I reveal a special technique at the end on those cat ear hairs…. The end result will be some gorgeous cat ears! Will you have a go?
I hope you enjoy it as much as I thoroughly enjoyed making the ears and presenting them to you in this video.
Needle Felting Cat Ears Tutorial
This is part four in the needle felted cat head series so if you’ve missed any of the previous parts you can view them at the links below.
Tutorial one for Needle Felting a Cat Head Shape is here
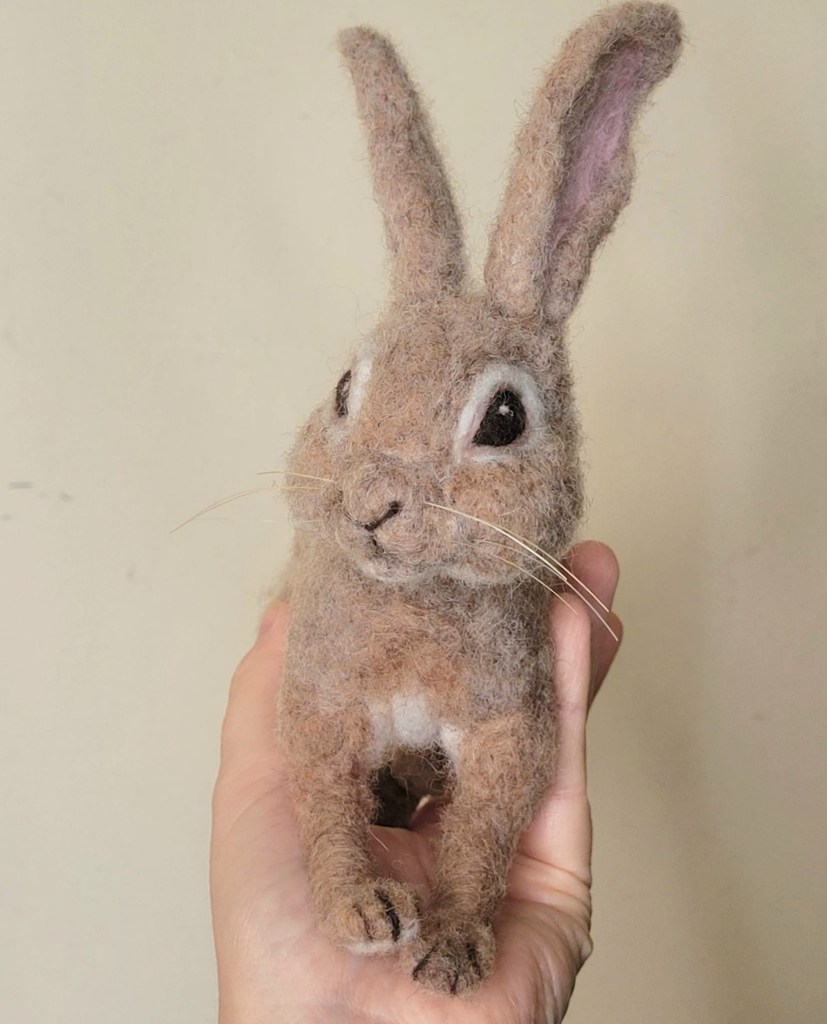
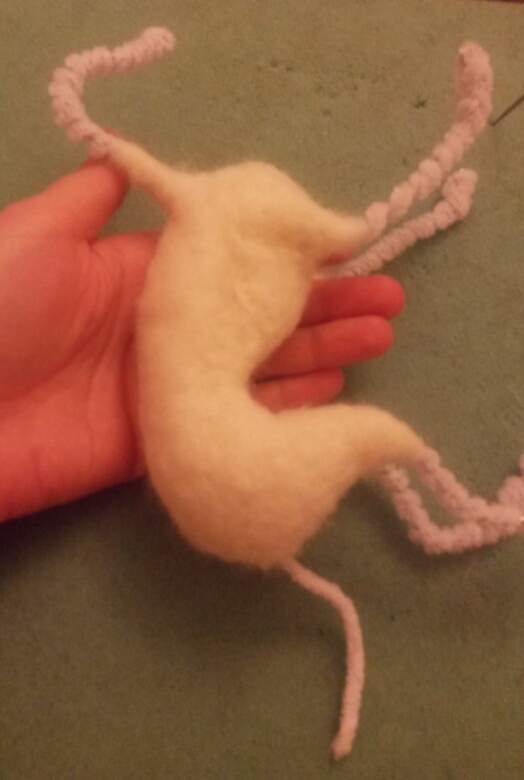
It’s wonderful how some wool and pipe cleaners can be transformed into a realistic needle felted bunny sculpture with just a little imagination, prodding effort and time!
I’ve made bunnies before but not a wild looking one. I chose some beautiful wools – carded slivers from themenagerie range at Heidifeathers. The main colour is called ‘rabbit’, the darker shade is ‘deer’ and the white is ‘polar bear white’. They were soft and easy to wrap, felt and blend.
Here is a time lapse tutorial that shows you the entire process and demonstrates the steps you need to make your own cute wild rabbit. The video includes pipe cleaner armature, wrapping wool, adding wool shapes to build the body, making paws, creating a head with face detail, adding wool eyes and lovely long bunny ears, attaching the ears and head, making a cute fluffy tail, reverse felting for fluffy fur, adding a darker shade for more realism and adding horsehair whiskers.
Have you ever wondered when to use a wire armature? or been confused as to what size wire to use? Maybe you are wanting to know what wool and needles are best for armature making?
In this video, the Complete Beginner’s Guide to using Wire Armature for Realistic Needle Felted Animals, I show you the tools and materials I use when making a wire armature and answer these common questions and more.
This tutorial is packed full of useful tips and includes 5 demos – Bunny & Fox armatures plus tiny rodent feet (guinea pig, rat and mouse)!
Heidifeathers have kindly sponsored the video. Get a 10% discount at their International online shop at https://www.heidifeathers.com using code Felting10 (first 50 customers only – so be sure to go there as soon as you can and don’t miss out!)
They have a wonderful range of wool, wire and tools, pretty much everything you’ll need for needle felting realistic animals. I use their wire, pipe cleaners, needles, wool, pliers, felting mat and horse hair in my video and I thoroughly recommend them if you’d like to get started!
Complete Beginner’s Guide to WIRE ARMATURE for Realistic Needle Felted Animals
I hope you enjoy the video! Let me know in the comments what animal you might like to make first with a wire armature 🙂
Are you needle felting a cat with short fur? or a long haired cat that has shorter furred areas?
This is part two in my series of Needle Felted Cat Head tutorials as demonstrated on a Tabby Birman sculpture!
I’ll teach you how to blend colours by layering wool and reverse felting. There’s also some planting of longer strands and trimming…
You’ll be adding short fur to the bridge of the nose, the cheeks, whisker pads, chin and around the eyes. I’ll also share my technique for whisker dots
So here is the video on needle felting short fur:
The next part (three) for needle felting long fur on your cat is here.
I’ve found that Needle felting a cat head really doesn’t need to be hard if you break it down into stages, have a plan and are patient with yourself and the process.
Following on from the time lapse video of the cat head process, this is Part One in the series of actual tutorials. Here I slow the footage down and demonstrate how I Needle Felted the ‘Cat Head Shape’ from core wool.
You are just 10 steps away from creating your own!. I hope you enjoy it!
Needle felted cat head tutorial
The next two videos in this series are available now too if you’d like to watch them:
You can use it to make fluffy fur, BUT there’s so MUCH MORE you can do with it too!
This video is your Ultimate Guide to the reverse felting needle.
In this needle felting tutorial I’ll show you what it is, what it can do. I’ll share top tips for how to get the most out of it and there may be some techniques you have never thought about!
I hope you enjoy it!
Please let me know what you might try to create with the reverse needle in the comments 🙂
The Reverse Felting Needle is a wonderful versatile tool and one of my all time favourite needles.
I get my needles from HeidiFeathers, they are brilliant in quality and all colour coded so you don’t lose track of which needle you are using! They deliver internationally and sell a variety of tools and fibres.
If you are starting out and don’t have any needles yet then it’s well worth getting a set of 30 Mixed Felting Needles – 10 Different types – Triangular, Star, Reverse & Twisted Needles https://amzn.to/3oSks9j
Or if you are looking to get individual needles then you can choose by needle type:
How do I create spots on my needle felted animals?
Here is a video tutorial demonstrating how to needle felt animal spots in 4 ways.
If you are a beginner you might just want to know how to add quick easy simple spots to start with to get a feel for your needles and wool.
Or you might be looking at how you can add more realistic felted fur on your spotted animal.
I also show you how a reverse felting needle can be useful to pull the wool fibres from your core base through your top layer of wool to form a spot.
Whether you are an absolute beginner or a more advanced learner, I hope you find these tips helpful on your needle felting journey. My aim is to teach you how to needle felt animals that are detailed and realistic.
Here are the time stamps to help you find the sections you may be looking for:
0:00 Intro to animal spots
1:47 Adding simple spots – this is great for beginners, a quick easy spot
5:35 Reverse felted spots – using a reverse felting needle to create spots
7:44 Long Layered spots – how to felt realistic fur on your spotted animal
15:31 Parallel planted spots – for fur that stands up (medium/short fur animals
So here is the video. I hope you enjoy it 🙂
What is your favourite spotted animal? There are so many to amazing animals out there to choose from but please let me know in the comments – I’d love to know.
NEEDLE FELTING TOOLS AND WOOLS:
****** Best NEEDLES I use for quality are from Heidifeathers. They all come colour coded so you’ll never forget which needle you are working with.
It’s well worth getting a set of 30 Mixed Felting Needles – Triangular, Star, Reverse and Twisted Needles – here
Clover Multi Needle Tool which holds 1 to 3 needles and really helps to speed up your felting: here
Have your 5 favourite needles in holders- 5 x Long Wooden Needle Felting Handle – keep as they are or decorate them? here
****** SCISSORS ******
Beautifully designed rose gold embroidery scissors – handy small size, sharp for cutting strands of wool for long furred animals and for trimming stray fibres –here
****** WOOL ******
Heidifeathers provides a wonderful variety of quality wools.
CARDED Wools – quick and easy to felt with Carded wool batts bundle of 4 natural wool shades; white, grey, dark brown and mid brown here
Carded wool batts, Carded Jacob Wool batts In Natural Shades here
‘Creature Mix’ Carded Wool Slivers HF – 6 wonderful animal shades of needle felting carded wool slivers, here
Or buy individual colours Heidifeathers Single colour Slivers, Natural sheep or alpaca wool tops – choose from a variety of animal colors and bright colours too here
Merino TOPS selection: Heidifeathers Merino Wool Tops Toy Box Mix (animal colours – 12 – total 300g) – here
PERFECT COLOUR PACKS for when you want to add fur to a particular animal – Merino Wool Tops :
Pack of 6 ‘Beautiful Browns’ here – donkey, mouse, tawny owl, mole, hare.
Pack of 6 ‘Grand greys’ here badger, koala, grey squirrel
Pack of 6 ‘Outstanding Oranges and Yellows’ here fox, red squirrel, autumn leaves, bumble bee, yellow chicks, orangutan
Pack of 6 ‘Gleeful Greens’ – here leaves, lizards and frogs, parrots
(Please see links disclaimer in the right hand panel)
Whether you are a Needle Felting beginner or a more advanced learner, sometimes you can lack confidence. I want to encourage you and show you how to become a confident Needle Felter. I share practical tips as well as mindset strategy to boost confidence in yourself and your abilities. If I can do it then so can you. 🙂
Now I sometimes hear some of you say that you’re actually embarrassed by what you’ve created, you compare yourself to others and you just don’t have the confidence in your felting abilities.
Some of you have started projects, you’ve been doing all the basics, but then you just feel like you haven’t reached a level of where you want to be, and some of you may even be trying to sell your creations but you just don’t feel that anybody would buy your work.
I want to encourage you all with 5 ways to become a more confident felter.
In no time I hope you’ll go from being self doubter to confident felter. 🙂
If you prefer to listen or watch videos then I have covered all this in this video below, if not and you prefer to read then please scroll down past the video and continue to read on.
So here are 5 ways to Needle Felt with confidence:
Recognize, and remember that you are on a journey.
That might sound a little bit strange, but this just helps me to realize where I’ve come and where I’m going.
It doesn’t matter if you’ve just bought some wool and you haven’t even started stabbing or whether you’ve actually done a few projects and you have learnt some basics or maybe you’re a professional at this and you sell your work.
We all start somewhere, and there’s always room wherever you are to LEARN and GROW and IMPROVE.
So I remember when I first started, I had no idea what needle nothing was. I’d been online and I found these amazing animals that people have made out of wool. And I was like, “what? how do people do that?” So I went online and I saw how they did it. -just some brief clips about it, and I made a decision right there and then to pick up my wool and my needles, I just got them online and I just sat, and I made a cute little cream bunny, which I still have today,
I’ve never sold it. To be honest, it’s my first work so not up to my standard now, but that little bunny as cute as he is and as simple as he was he is a reminder now of my journey so far. I can look back, and I can think of where I started all those years ago with some real basic techniques and now look at me now and see how far I’ve come. If I hadn’t started and got stuck in, I wouldn’t have probably had the confidence that I have today.
I can also encourage you today because I have been the starter where you might be today. I’ve been at the edge of whether I can sell my animals.
If that’s what you want to do, you know you absolutely can with a bit more confidence, a bit more skill, and that’s something that you want to do go for it. I did, and I’ve sold some lovely pieces, and I’ve received so much lovely feedback from people as well.
Yes, I’ve experimented on this journey, and I’ve very much learned through trial and error, and yes, I completely aspire to become better and improve my work all the time, and I absolutely am inspired by and admire those people who make the most beautiful creatures. But at the same time, I recognize I’m on my own journey.
Wherever you are on your journey right now, it’s completely fine. It’s ok to be where you are but know that there is so much more to come.
Get to know and love your wool and your needles.
If you’re not confident in what the different wools can do and what the different needles can do, then you may not be confident in what you as a felter can do.
So what I always suggest is that you get to know and get really familiar with the different fibers that are out there, and also get to know what the different needles can do,
So, the wool actually is very forgiving. It doesn’t judge you (I’m not saying that people judge you either).
Often in fact, the wool has its own mind. Sometimes you’ll find when you start a project you’ve got this great plan of what you want to make, and as you make something, it molds into something else and becomes a different animal. I’m sure many of you have had that happen!
Think about it as you are a potter with your clay, but in needle felt terms – you are a needle felter with your wool, and you’re going to be sculpting with that wool to make something beautiful.
This is your material that you’re using. So get to be familiar with the different types and look at the different sheep breeds if you’re using wool and maybe even other non sheep species like alpaca or camels. If you’re using non wool types such as vegan friendly fibers, that’s brilliant as well. There’s so many different fibers out there.
Maybe you’ll start off with certain wool like core wool that’s more abrasive and easier and quicker to felt then later on add a more softer finer wool for the detail.
If you’d like to delve deeper into what the different wool types do e.g know the difference between wool tops and wool batts, or would like a quick guide to the sheep breeds, then head over to my wool guide here.
You’ll get to know which fibers you like and you’ll be more confident in knowing what you’re doing for each project and you’ll become more confident in your abilities overall.
What I would suggest is that when you start out you always start a little bit smaller and then build the layers on top. It is so much easier to add wool than to take away. Although I have to say on occasion I’ve had to cut things off, and I know that’s a big no no in the needle felting world. But sometimes it’s easier to cut something. I’ve cut a head or a nose off before.
This is what needle felting is all about, you get to work with the fibers, you have your favorites for the different sculptures you’re making and you make it work for you.
In the same way with the needles, get to know different types of needle, try them out, experiment. Feel comfortable with what you’re using. These are your tools to use, so if you’re using the right needles, the quicker more efficient that you will become. You can easily add the detail to your animals as well. Again, you’ll probably find that you have a favorite that you love to use.
When you feel confident in your wool and your needles, you will find that your overall confidence will build up, and you can then just let your imagination flow.
Learn from others and be part of the community.
So I don’t know if you’re on social media, but I certainly am, and i’ve really found some of the felting groups out there to be the most encouraging places to be. You can learn from other people, you can be inspired by those more experienced than you and you can also get tips and learn techniques from others as well. I found it to be really encouraging. It gives you that kind of confidence boost when people say that they like your work. Now it shouldn’t be all about that, but I really think it does help. You can get little tips on maybe how to improve as well if you want to.
If you’re not on social media, that’s completely fine, too. You might find that there’s a local group where you can learn alongside other people in person, which is even better
Remember that COMPETENCE leads to CONFIDENCE, so the more that you do something and get good at it, the more confident you will become. So keep practicing and learning.
So there’s loads of free and paid for resources:
Youtube to watch videos to understand how to needle felt and improve your techniques. Please do subscribe to my needle felting channel here. I have many more tutorials planned.
There’s also online tutorials like on my website here so you can learn from picture tutorials.
PDF tutorials that you can download, needle felting kits and books to buy out there too.
As I mentioned earlier, you could find a local community group that is doing a workshop, learning alongside a friend can really encourage you and build your confidence when your learning to needle felt.
There’s also online workshops, which you can find if you do a really good Google search.
I suggest when you’re learning, not to try everything all at once, master those little projects first before you leap into something more complicated. Once you’ve become confident in the basic techniques, then you can move on something far more challenging.
Embrace the mistakes along the way,
So learning and practicing is great , but don’t be afraid of making those mistakes along the way. Those mistakes will drive you forward so you can make even better creations. When you make the mistakes, you remember them and the next time you’re less likely to do it, yeah. You’re more likely to improve when you experience those mistakes. You can then hone your skills and become a better and more confident needle felter.
Sometimes I find too that making mistakes enables me to find a completely new technique that I hadn’t even thought of before, and that is all part of experimentation and trial and error.
If you break a needle, for example, you will soon learn. You don’t want to break more needles and buy more needles and have more expense, so you will soon learn how to achieve the pressure that you should be stabbing with and what angle to stab at.
Reading a book or watching a video is good for learning but the true meaning happens when you physically try it and do it by yourself. Having those personal mistakes happen to you will mean you soon learn, even though it can seem like learning the hard way.
I can look back at all the mistakes I made and realise that if I didn’t make that mistake I may not have honed my skills the way I have and be where I am today
Another mistake that people often make (and I am very guilty of this as well) is starting off making something that ends up being too big or certain parts of the animal are completely out of proportion. Yet you thankfully soon learn to plan a little bit better, take your time, and make a better proportioned animal.
Sometimes you might feel when you make that mistake that it’s all gone wrong, and you don’t feel confident at all. Well, I just want to reassure you, MISTAKES ARE OK to make!!. I’m pretty sure that when you speak to anyone no matter how experienced they are that they still make mistakes.
If you make a mistake, – don’t let that affect your confidence, just see it as something that’s part of your journey, take a deep breath, you’re not going to make as many mistakes moving forward as maybe you will in the beginning. So just see that as an experiment, see it as a learning curve and then move on! 🙂
Discover and follow your individual style.
You have your own inbuilt style, and this is what DIFFERENTIATES you and makes you UNIQUE from any other artist!
Of course it’s really important to learn, so if you want to go and follow kits or you want to follow youtube videos or read blogs posts like this, then that’s completely fine. You can really improve your skill and obviously being competent makes you more confident. Yet at the same time it’s really, really important to find your own unique style.
When looking through Google images of needle felted animals or when browsing social media it’s really amazing how you can look at those pictures, and you can recognize straight away who the artist is because they have their own style, and so this is what will happen for you.
Maybe you’ve already found your style – that’s brilliant, please follow it!
But if you haven’t yet just again, get to know what you love, get to know what really makes you happy in your hobby and find your individual style.
Personally. I love the tiny detail and the realism and making animals to be as lifelike as I can. I have to say that I’ve been really frustrated in the past when I’ve seen other people make animals, and they can do them really quickly. They can maybe do a whole animal in like a day or even a couple of hours. I thought to myself, “oh. If only I could make things quicker, I could also sell things quicker”.
But then when I think about what my unique style is and what it is that I appreciate in art, – I appreciate the detail, and if I’m going to create the detail and if I’m going for something realistic, – then of course, it’s going to take me time.
So don’t get stuck in the mindset that you need to be like someone else or do the same thing as someone else. Don’t compare yourself in that way, find your own style, and then follow that style and be the needle felter that you were meant to be!
Yes, be inspired by other artists, but be confident in yourself, don’t come under any pressure to be like anyone! Express yourself and who you are through your needle felted creations!
So, are you a self doubter or a confident felter? Please let me know in the comments.
My site includes links for where to source needle felting tools and materials. These are my personal recommendations and from my favourite suppliers who I trust and who have excellent reviews. Some are affiliate links so I may receive a small commission at no extra cost to you. This supports my website and enables me to continue to provide valuable content and for that I am so very grateful to you – Thank you!!