RSS Feed

Tag Archives: long fur

How to Attach Long fur to Your Cat Head

Would you like to know how I needle felted the long fur on my Tabby Birman cat? 🐈

Here is a video tutorial with techniques of how to blend wool colours, plant (attach) long fur to your cat head, layer the wool pieces, reverse felt wool in some areas (for blending, gradients and fluffy fur), create tabby marking patterns and trim wool.

It’s great if you would like to make realistic cat fur!

This is part 3 of 5 in my series of Needle Felted Cat Head tutorials.

I hope you enjoy it 😊

Here is the next tutorial for making the cat ears.

Or if you would like to know how to do the whiskers then that part is here.

If you missed the previous 2 videos or would like to rewatch them:

  • Tutorial one for Needle Felting a Cat Head Shape is here.
  • Tutorial two for short fur is here.

There is also a time lapse video of the whole head showing footage of the amazing process from start to finish here.

Or if you’d like to see exactly how the cat’s eyes were made purely from wool, then you can watch the tutorial here.

Advertisement

How to Needle Felt Long fur; The Video Series!

Would you like to learn how to attach long fur to your needle felted animal? not sure how to firmly add the wool or where to begin?

You have likely seen my photo tutorial with basic techniques for adding long fibres onto a badger. Well here is a video series for those of you who learn best by watching how it’s done. These are far more in depth with more techniques and tips along the way! You too can create a detailed and realistic fur effect!

This was available as a paid tutorial for some years but I have decided to offer it for free. I have embedded all 4 parts on this page for you to watch and have included chapter start time stamps, so feel free to start at the beginning or skip to the parts you feel would be most useful 🙂

Difficulty ranking: Intermediate level or beginners looking for a challenge.

The result: Amazing detail; the look of a real animal with layers of fur.

Needle felted donkey (9)

In this series of videos I demonstrate how I create a realistic fur look by attaching lengths of wool to my miniature donkey. These techniques can be adapted for any long furred animal. Join me on my journey from preparation to finish; starting with carefully ‘needle brushed’ leg fibres, then fluffy tummy and long textured back fur. You will also see how I create a middle parting on the donkey’s muzzle, add a long fluffy fringe and a beautiful flowing mane.

Skills you will master across the 4 parts:

  • Simple hand blending of wool roving for natural, textured colour tones
  • Preparing wool lengths and a test/sample piece
  • Knowing how firm to felt your core base
  • Two easy methods to firmly attach various lengths of wool fibre
  • The art of layering and trimming fibres
  • Specific skills for adding fur to various body parts including legs, tummy, back, ears, tail, face and mane
  • How to prevent over felting or flattening of long fibres
  • Finishing techniques for defining strands or fluffing them up

Music is by two artists; Jahzzar and Slainte (full use rights).

Details of where you can get my tools are at the end of this page.

Please note: this tutorial series assumes you will have already felted the basic animal shape. My demonstration donkey already has a wire armature with core wool wrapped over it plus facial features and hoofs. I show the advanced techniques beyond this.

PART 1: Hand blending wool, attaching fur to legs (time stamps included below for chapter begin times)

Intro (0:00)

What you will learn in part 1 (01:05)

Where to start? (02:00)

Preparing and blending wools (03:30)

What tools do I need? (11:56) (links to the tools can be found at the end of this page)

Shorter fur – layering on the legs (I show the basics of the 2 techniques) (13:30)

PART 2: Attaching fur to tummy, torso & rump (time stamps included below for chapter begin times)

Intro (0:00)

What you will learn in part 2 (0:52)

Soft tummy fur (technique 1) (01:28)

Continuing the tummy (and a few ways of blending colour) (07:03)

How firm should the core wool be? (11:10)

Lots of thick fur layers (across the torso) (technique 1) (13:13)

Tips for preventing fluffing up and positioning animal whilst felting (18:02)

Adding fur on rump (techniques 1 and 2) (19:20)


PART 3: Adding fur to back, muzzle and fringe (time stamps included below for chapter begin times)

Intro (0:00)

What I’ll cover in part 3 (00:52)

Long fluffy back fur (technique 2) (01:24)

Ears and tail (brief overview for ideas) (09:18)

Fluffy textured muzzle and fringe (very long fur pieces) (technique 2 plus other tips) (10:56)

PART 4: Donkey mane, defining and finishing (time stamps included below for chapter begin times)

Intro (0:00)

What I’ll cover in part 4 (00:52)

Making a mane (an extra attachment method) (01:21)

Attaching the mane (08:05)

Finishing off your animal; defining etc (14:28)

Final donkey photos (what a cutie!) (18:58)

************* LINKS TO THE TOOLS: ***********************

Best NEEDLES I use for quality are from Heidifeathers (all come colour coded for easy identification too)

Well worth getting a set of 30 Mixed Felting Needles:

– 10 Colour Coded Different types – Triangular, Star, Reverse and Twisted Needles – get here.

Or you can choose them by needle type

e.g.: – 38G Star Needle -10 needles – get here

or 38G Triangle – 10 needles – get here

*** CLOVER NEEDLE HOLDER *** (I love this tool for speeding up time it takes to felt)

Clover Multi Needle Tool which holds 1 to 3 needles: best price I’ve found online is here.

*** NAIL SCISSORS *** (good old faithful low cost scissors) – here

(Please see disclaimer about links in the right side panel to this page)

More needle felting tutorials can be found over on my tutorials page 

Don’t ever miss out on my latest tutorials! Insert your email address and click the ‘Follow’ button on the right hand panel to receive notifications of when the next post is up..:-)

Needle felted guinea pig (number 3)

May I introduce you all to my third needle felted guinea pig. I made her in loving memory of a beautiful piggie of a lady in Warrington. I completely enjoyed felting her especially as she has the cutest face and wonderful markings!  She has now gone to live at her furever home and will receive lots of cuddles. She is also my first creation to have one of my new ‘Fit to be loved’ heart tags sewn on. 🙂

Here are few photos of her when she was a work in progress. If you would like more ideas on how to make a guinea pig of your own please see my photo tutorials; felting a guineapig and felting long fur.

Needle felted WIP guineapig (17) Needle felted WIP guineapig (18)

Needle felted WIP guineapig (21)

Needle felted WIP guineapig (20)Needle felted WIP guineapig (22)

Needle felted WIP guineapig (23)  Needle felted WIP guineapig (25)

Needle felted WIP guineapig (27)

Needle felted WIP guineapig (28)

And here she is all fluffed up and posing for the camera 🙂

Needlefelted guinea pig (12)   Needlefelted guinea pig (6)

Needlefelted guinea pig (25) Needlefelted guinea pig (21)

Needlefelted guinea pig (1) Needlefelted guinea pig (13)

Needlefelted guinea pig (2) Needlefelted guinea pig (3)

Needlefelted guinea pig (4)  Needlefelted guinea pig (11)

Needlefelted guinea pig (16)  Needlefelted guinea pig (23)

Needlefelted guinea pig (24)

Don’t ever miss out on another blog post! enter your email on the right hand panel of my about page for notifications of when the next post is up..:-)

How to needle felt long animal fur

How to needle felt long animal fur

Ever wondered how to get those luscious layers of long fluffy fur on your needle felted animal? more importantly how can you get them to look natural and stay put!?

Whilst making a badger I took some photos of him along the way to show you. It is fairly simple to do but does take quite a long time although once done it does give you a real sense of satisfaction and the fur really does feel soft and fur-like. Of course the end result texture does depend on the type of animal you are felting and the type of wool you wish to use.

If you are new to this amazing art form then before you get started – check out my tutorial ‘what is needle felting’ for basic needle felting techniques.

What wools to choose? 

For my needle felted badger I had already made his body shape by sculpting with natural carded wool. I recommend wool batts which come in long thick sheets, making it easy to pull sections off and the wool is really fast to felt with.

Then for the top coat (which I will be demonstrating in this tutorial) I mixed grey and black merino wool tops with a few strands of some natural undyed wool tops for a rich cream colour. I particularly love the merino sheep wool as it comes in a variety of animal colour options and is lovely and soft to touch. Natural wool tops in breeds such as Jacob or corriedale are quick to felt and are a little more fibrous to the look and feel. When using wool tops the fibres all lay in one direction so they are perfect for cutting lengths and adding these to resemble long fur on your needle felted animal.  If you would like to you could use other luxurious fibres such as baby alpaca.

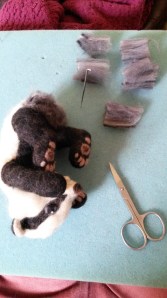
What tools will you need to attach the fur?

Very simple you just need:

How to needle felt long animal fur (30)

NB I didn’t want to completely flatten my fur down but allow it to stand out with some volume so only used one needle at a time rather than a multi-needle tool and changed my needle depending on detail and thickness of wool being needled. .

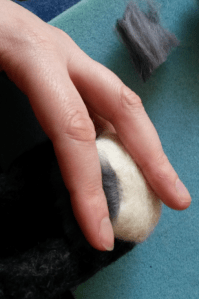
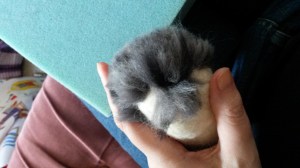
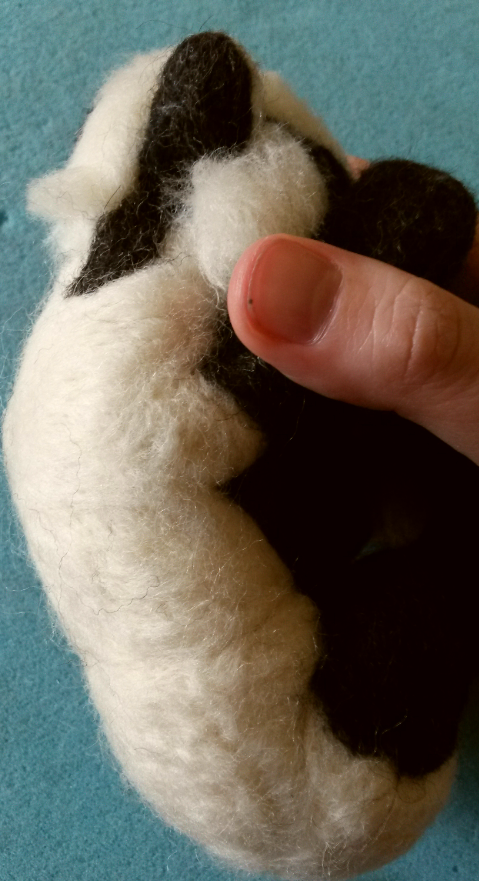
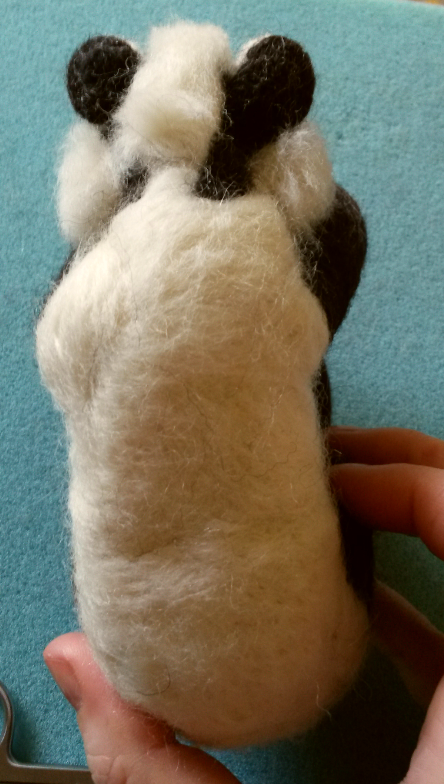
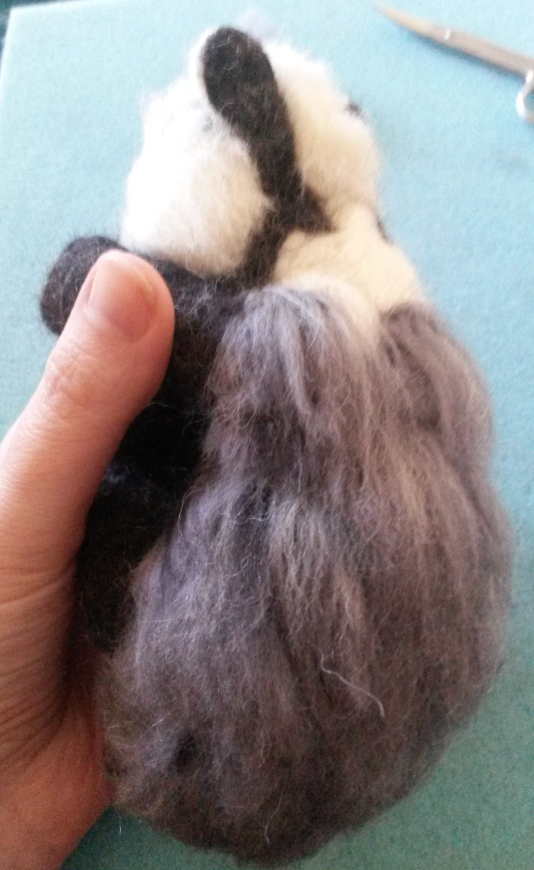
As you can see I have completed my badger except for his back fur and tail at this point. For how to make a badger head please see my tutorial here.

How to needle felt long animal fur (2)

How to needle felt long animal fur (30)

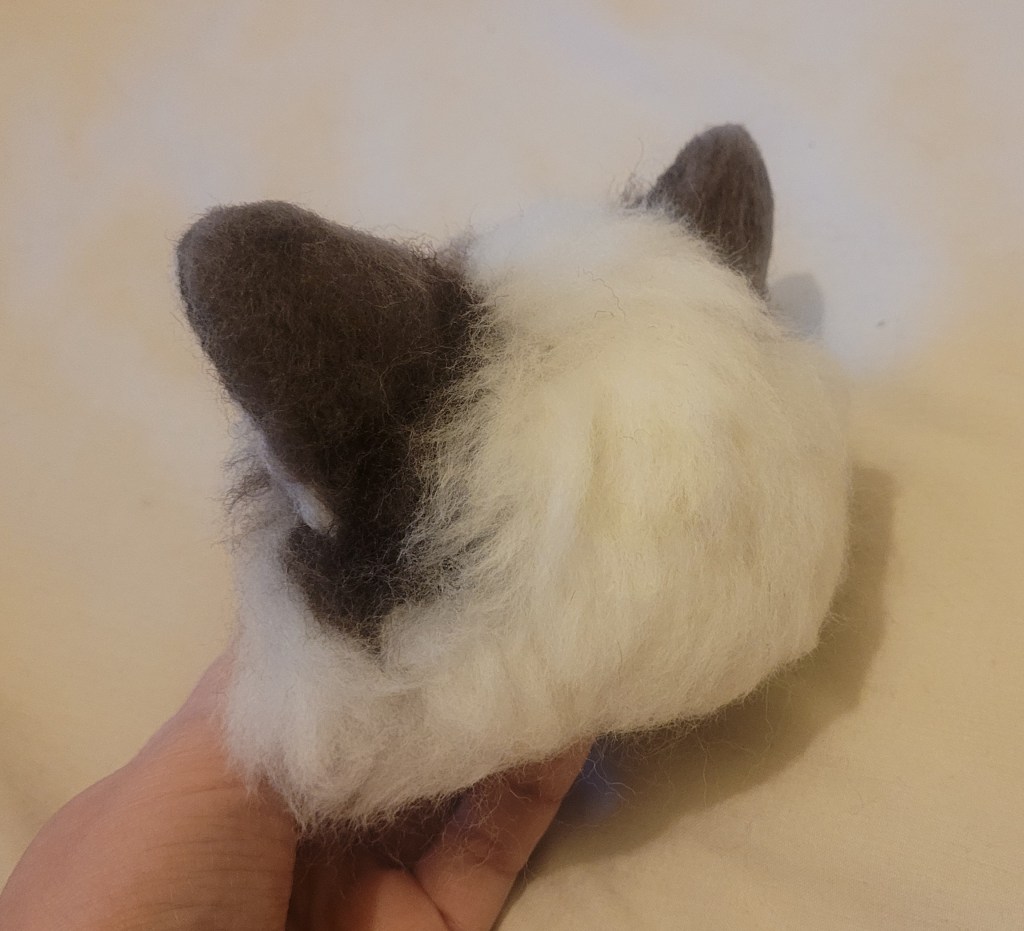
I love the fur on a badger’s back, it is greyish in colour but with flecks of black, brown and cream.

How to needle felt long animal fur (3)

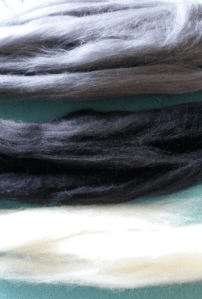
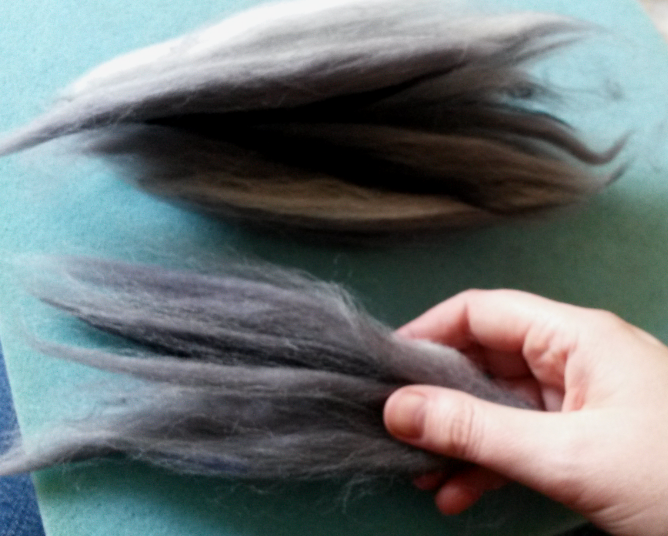
Now you could use carding brushes or dog brushes to blend the colours of wool but I wanted to keep the fibres all going in one direction as much as possible at this point and with block strands of full colour in black / cream / grey so not fully blended.

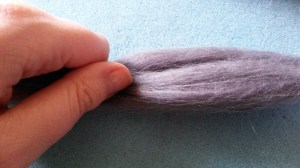
To achieve this lay lengths of each colour on top of each other and then using your thumb and first finger of each hand at each end of the wool lengths, pull your hands apart pulling the wool away from each other. Lay each layer again on top of each other (fibres all in same direction) and keep going until all the wool is blended as much as you want it to be.

How to needle felt long animal fur (28)

How to needle felt long animal fur (6)

How to needle felt long animal fur (4)

How to needle felt long animal fur (5)

How to needle felt long animal fur (8)

How to needle felt long animal fur (7)

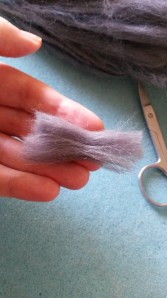
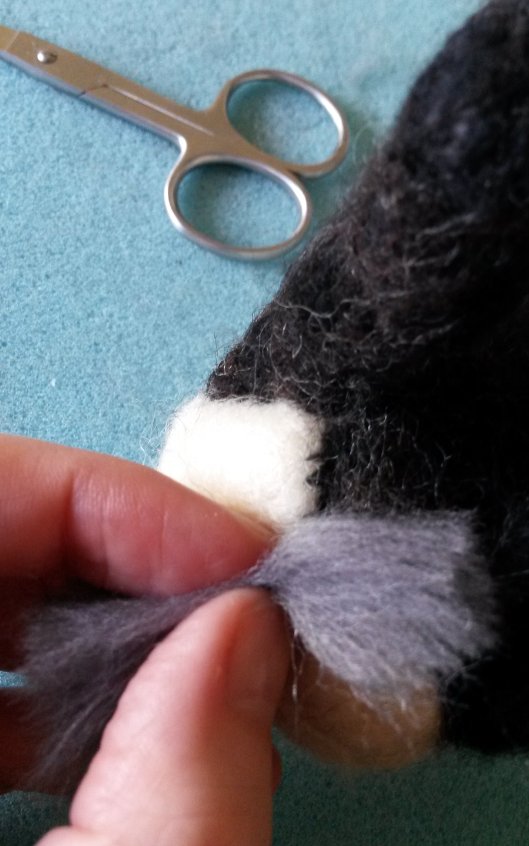
Then take narrow strands of the mixed wool the width of one or two fingers

How to needle felt long animal fur (1)

… and cut these into small pieces, roughly the same length. The length will vary as we felt as some areas will have longer fur than others…

How to needle felt long animal fur (10)

They don’t need to be perfect as no badger will have its own hairdresser with a perfect hair cut. 🙂

How to needle felt long animal fur (11)

I will now demonstrate what you will do with each piece..

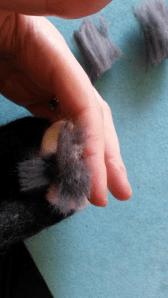
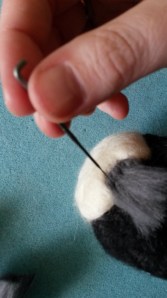
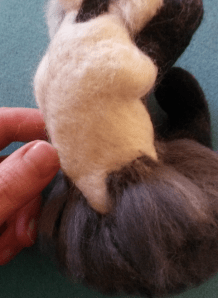
Take a piece and slightly pull in the centre in a bow-like shape

How to needle felt long animal fur (2)

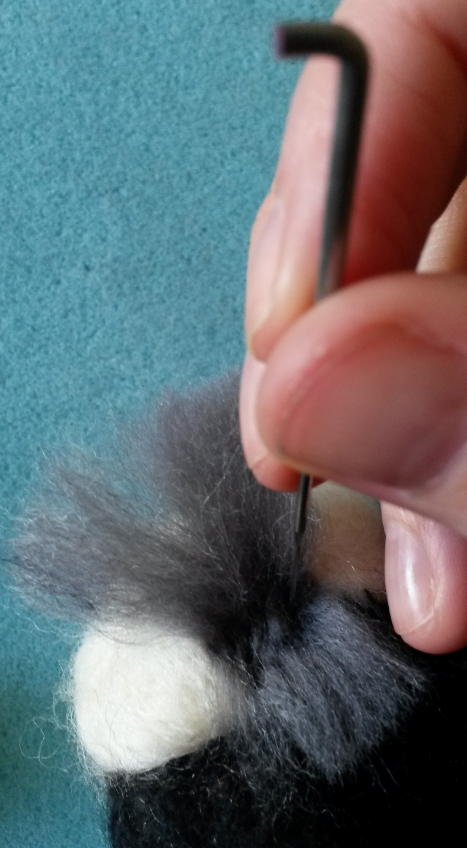
To layer the fur we need to felt from the back end of the animal layer over layer until reaching the head… so place the first piece at the very bottom of the badger’s rump.

How to needle felt long animal fur (12)

Felt using your barbed needle along the centre parting of the wool piece in various directions, the depth should go down to the first few barbs but the aim is to felt shallow but in many directions for the wool to stay put.

How to needle felt long animal fur (13)

How to needle felt long animal fur (14)

You can also felted slightly below the centre line onto the bottom half of the piece to ensure it is in place.

How to needle felt long animal fur (15)

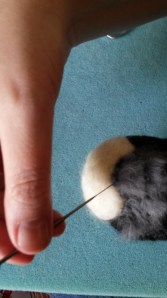
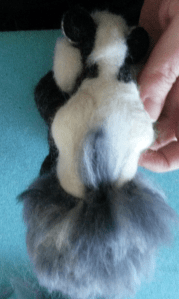
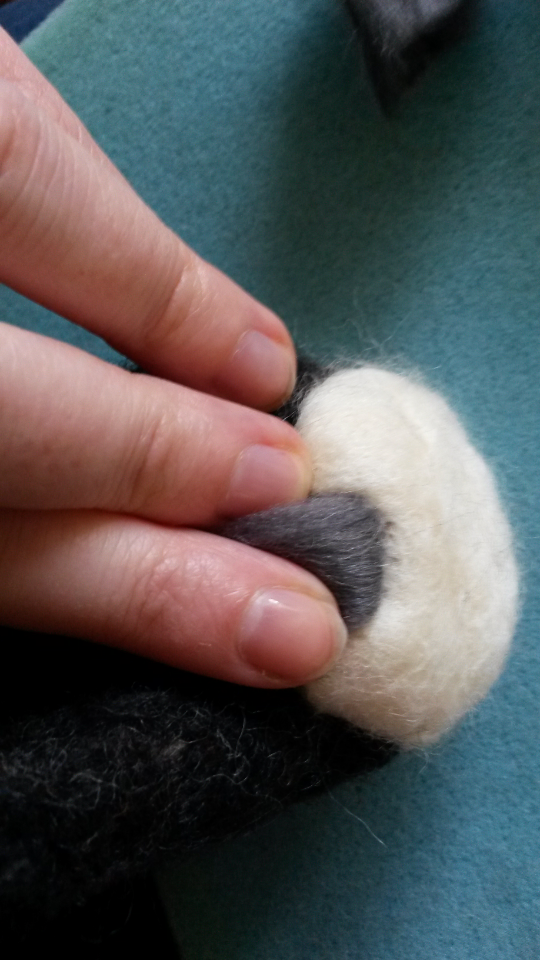
Now carefully pull down the top section

How to needle felt long animal fur (17)

How to needle felt long animal fur (19)

How to needle felt long animal fur (16)

… and ensure there are no stray edges by encouraging the wool in from both sides..

How to needle felt long animal fur (20)

Now felt along the top folded edge until it is firmly in place.

How to needle felt long animal fur (9)

Felting along the centre and then on the top edge in this way helps the wool to stay in place. Give a tiny tug to check it doesn’t easily pull out. NB a really good tug will likely pull fur out hence why these cute little animals are not meant to be toys to be pulled around…they should take cuddles and some handling though so ensure you felt well.

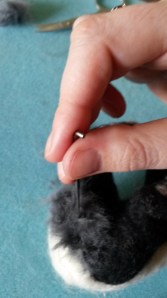
Again ensure you felt in many directions and then continue on to the next piece…layering the wool to create a fur look..

How to needle felt long animal fur (5)

How to needle felt long animal fur (10)

When moving up to the next layer, position the wool just above the last layer – you don’t want gaps in between of core wool showing so don’t leave too big a gap…

How to needle felt long animal fur (7)

How to needle felt long animal fur (3)

Don’t worry about the fur being too long or tufts sticking out, as you can give the end of the fur a trim as you go (time to use your hairdressing skills :-))

How to needle felt long animal fur (12)

By the way this doesn’t need too much skill and I am definitely no hairdresser, just trim in various directions for a more natural fluffy look.

How to needle felt long animal fur (13)

Any bits you trim off can be used for other felting projects or even for any areas you wish to fill in later at the edges so don’t waste them just put aside in a neat pile for later..

How to needle felt long animal fur (14)

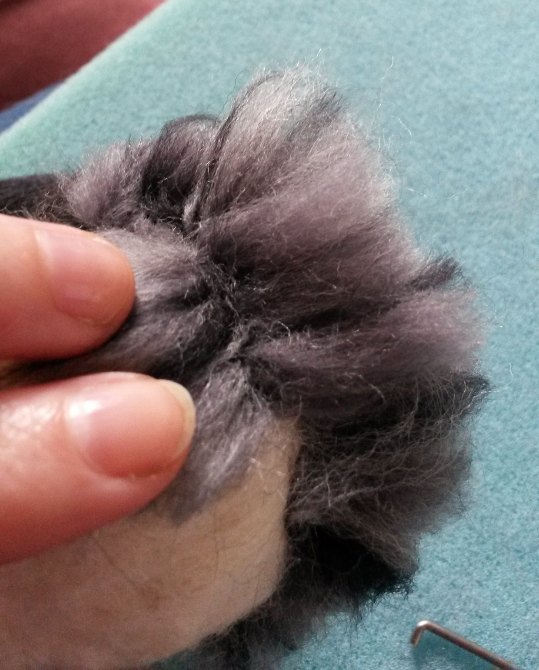
Optional; For the back end of the badger I wanted this to be extra fluffy with the fur standing up slightly on end so to achieve this, run fingers through the strands of wool to fluff up and stab the wool all over between the strands, not to felt down but to fluff up…(

How to needle felt long animal fur (15)

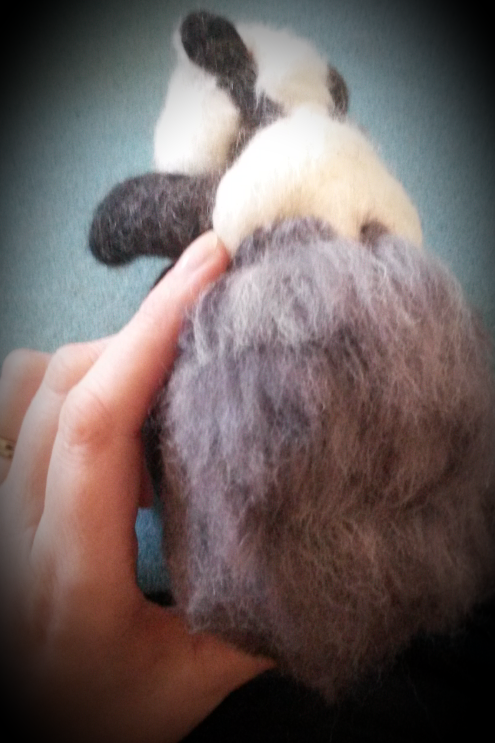
As you can see we have a way to go but we are on our way !!

How to needle felt long animal fur (18)

Aw look at him waiting so patiently to be finished 🙂

How to needle felt long animal fur (17)

You may find it easier to turn his body as you go – work with whatever position you find comfortable and whatever means less squishing of his cute little nose into the felting mat..

How to needle felt long animal fur (19)

As you reach the main length of his body you may now decide to cut the lengths of wool a bit longer

How to needle felt long animal fur (20)

For a more realistic look vary the colours so that you sometimes get more black or cream in the strand you felt…mix it up a bit..

How to needle felt long animal fur (21)

How to needle felt long animal fur (28)

Keep going…

How to needle felt long animal fur (27)

How to needle felt long animal fur (26)

How to needle felt long animal fur (25)

How to needle felt long animal fur (24)

Almost there… take a breather – have a hot chocolate !!

How to needle felt long animal fur (23)

How to needle felt long animal fur (23)

How to needle felt long animal fur (22)

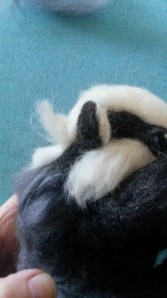
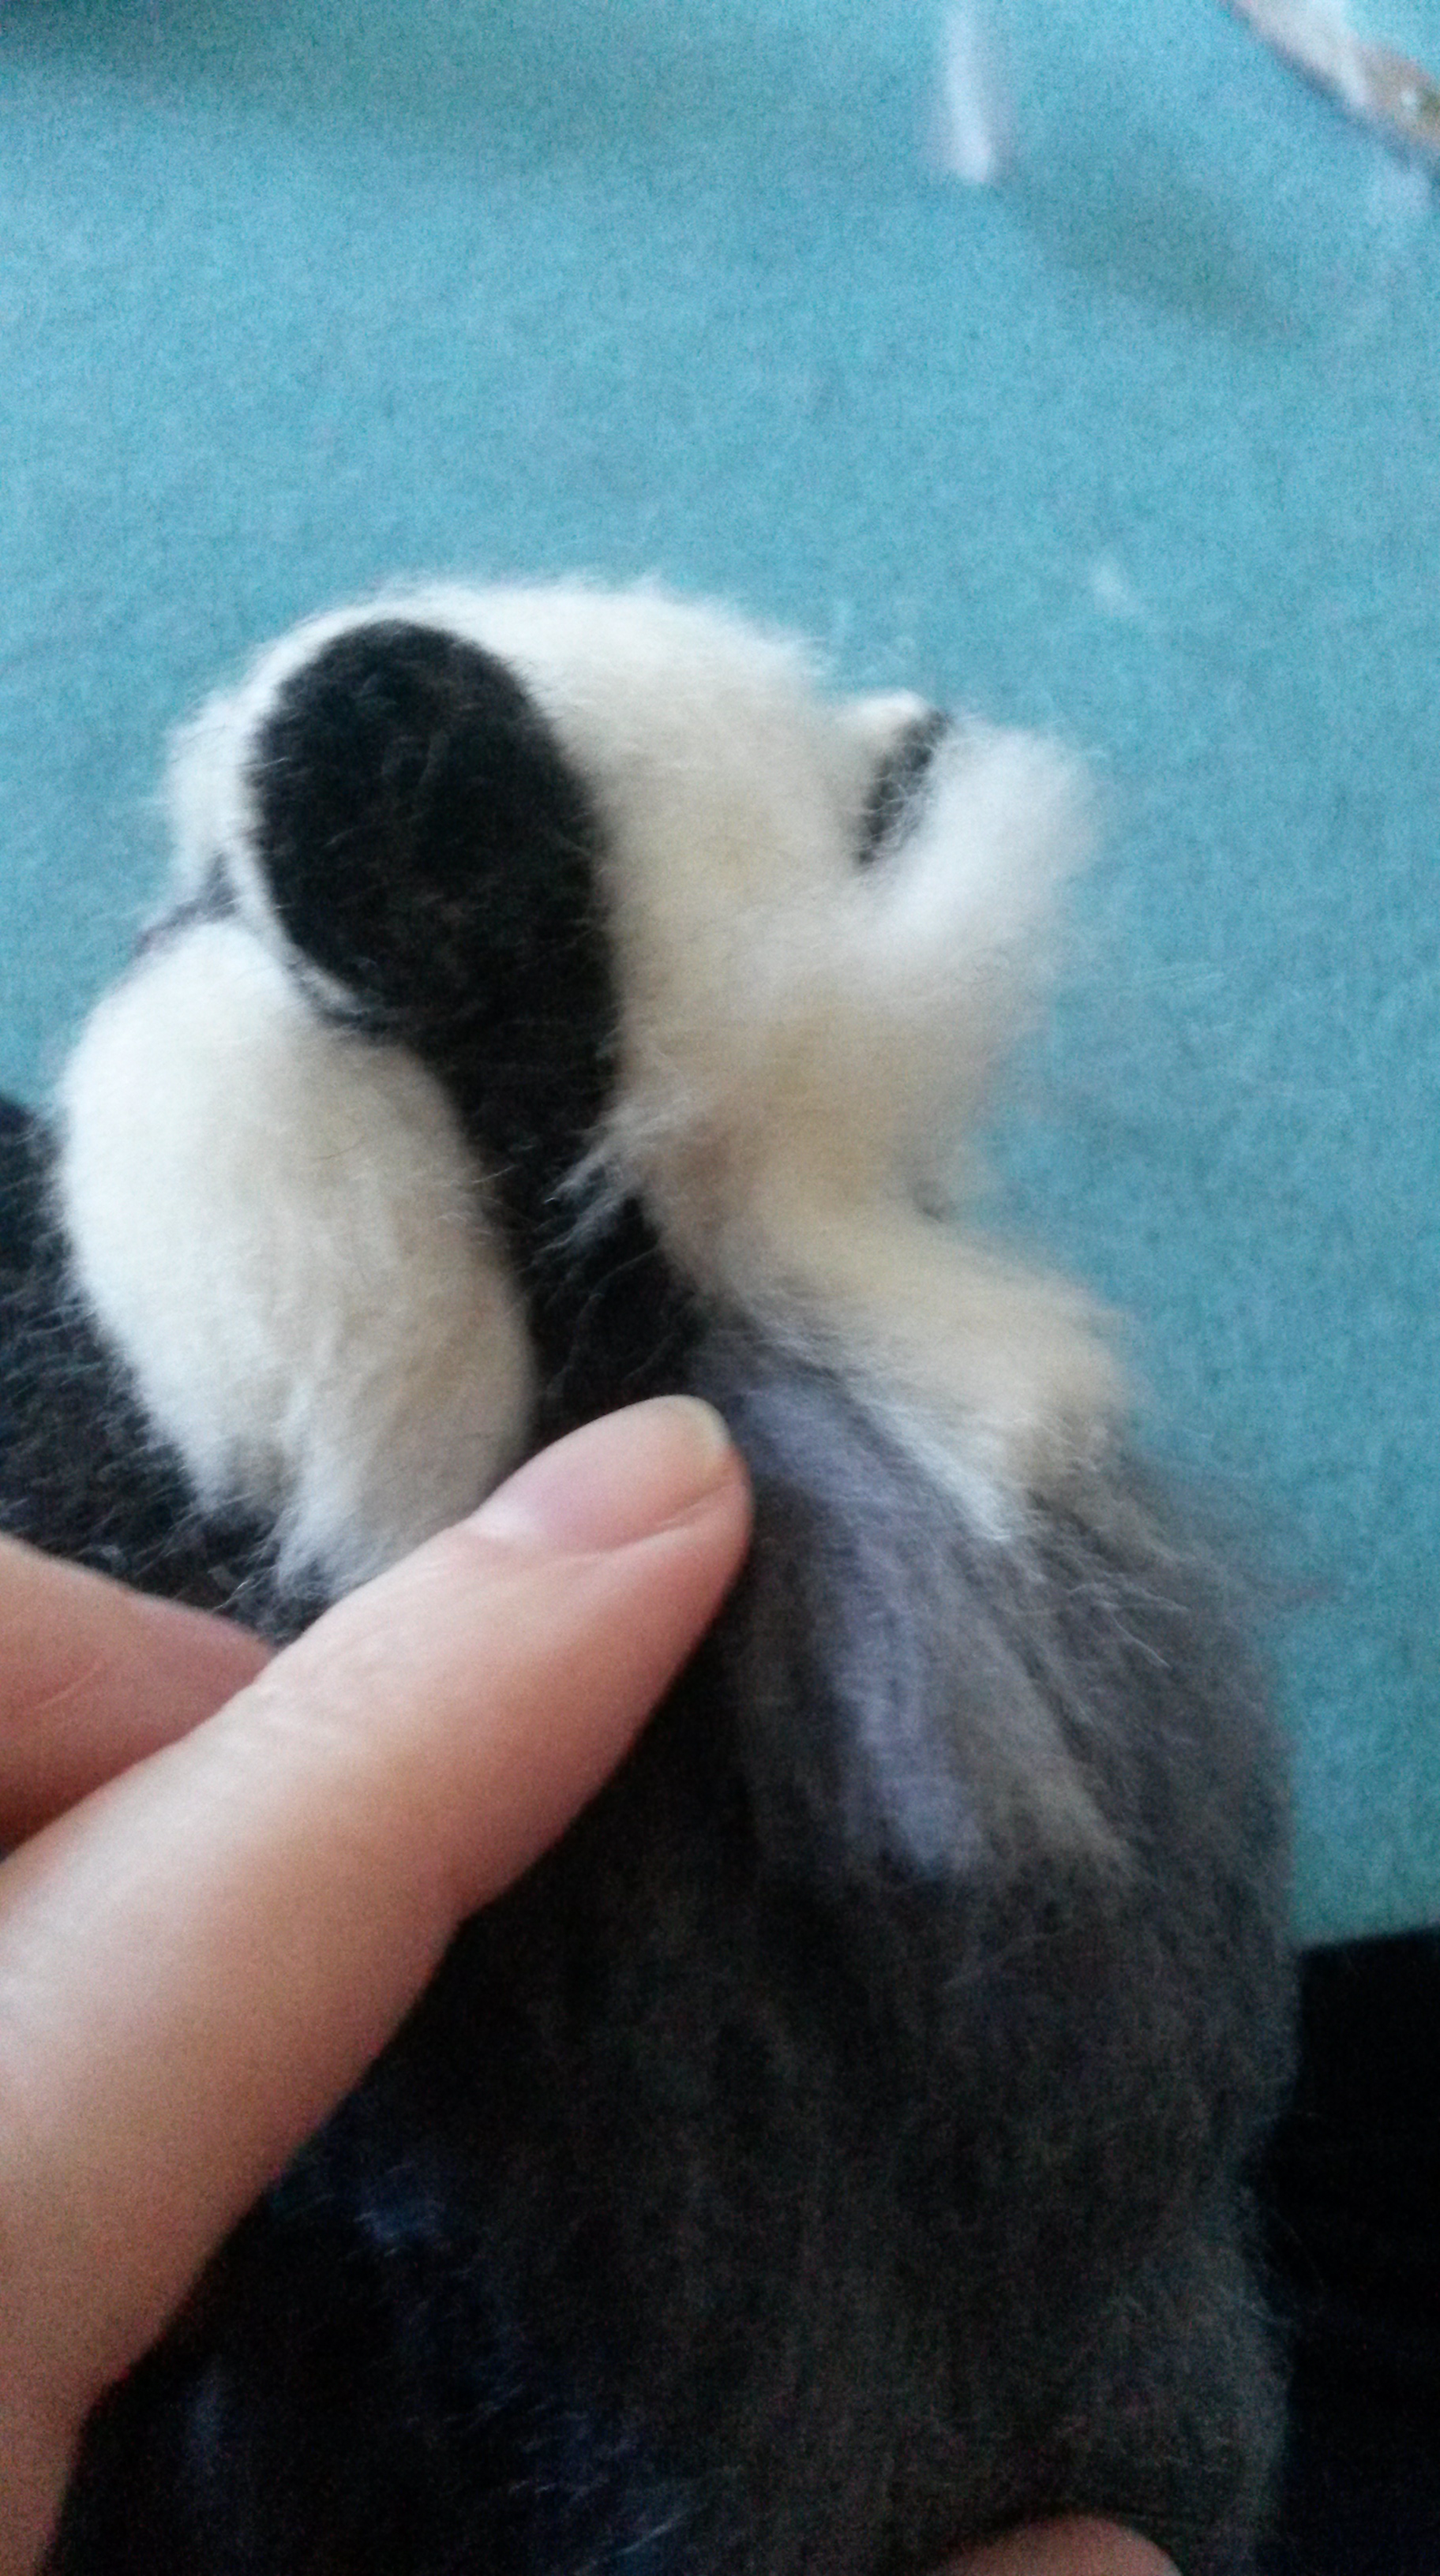
Specifically for the badger- when reaching the neck line, overlay some strands of black wool at the base of the ears …

How to needle felt long animal fur (24)

Then finish off with some more of the cream at the base of his head..

How to needle felt long animal fur (25)How to needle felt long animal fur (26)

You can use a normal sewing needle now if you wish to carefully fluff up the fur where it may have flattened slightly..

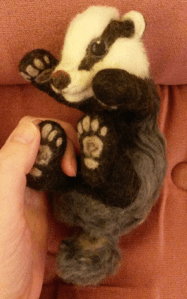
And there you have a gorgeous badger! fully furred waiting to be cuddled and fit to be loved!!

How to needle felt long animal fur (1)

I added his tail after this which also had several layers of wool as fur…

Here he is all completed !! so playful !!

Needle felted badger latest

Long Animal Fur video!

Find it easier to learn by watching how it is done?  

3 
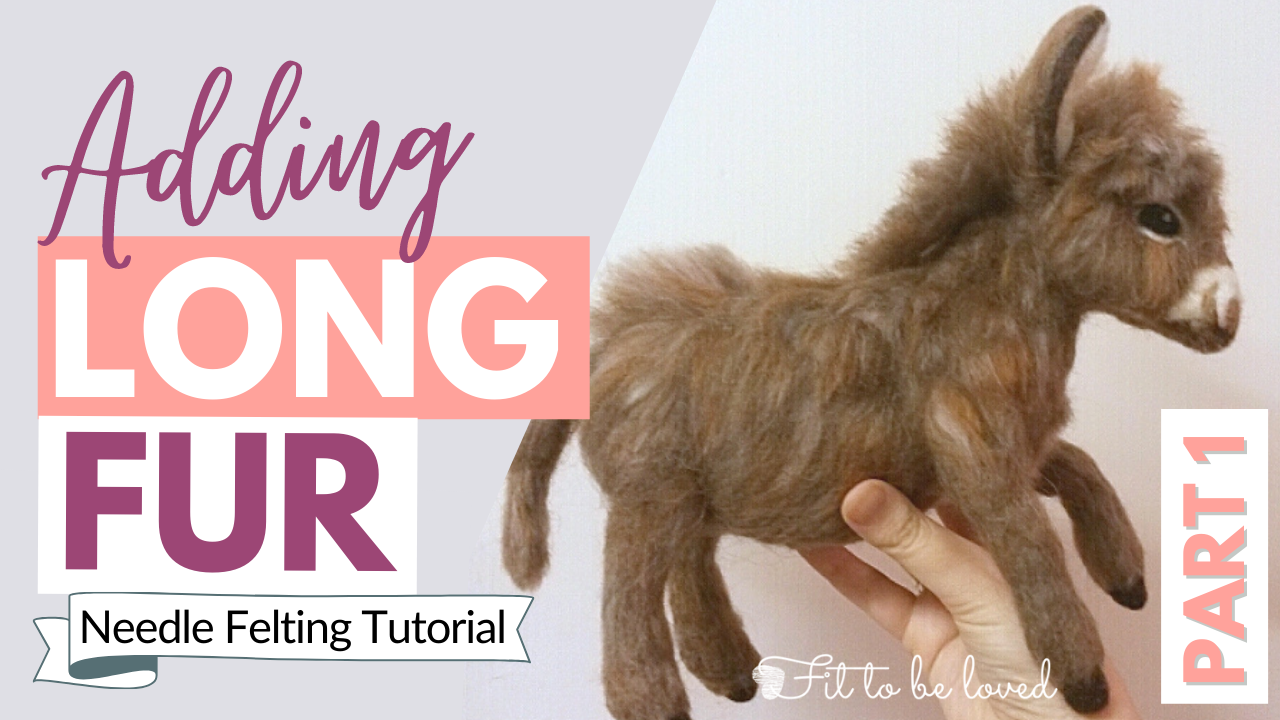
My ‘Long animal fur’ video tutorial is NOW AVAILABLE on my YouTube channel in 4 parts.

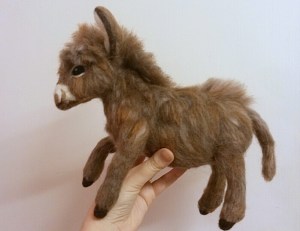
<<<Click the donkey picture to start watching part 1

 You’ll learn even more techniques for adding long fur (as demonstrated on this adorable miniature donkey).

Did you find this tutorial helpful? What would you like to learn about next? Please leave comments. Why not post a photo of your own creations?

Don’t ever miss out on my latest tutorials! Insert your email address and click the ‘Follow’ button on the right hand panel to receive notifications of when the next post is up..:-)

%d bloggers like this: