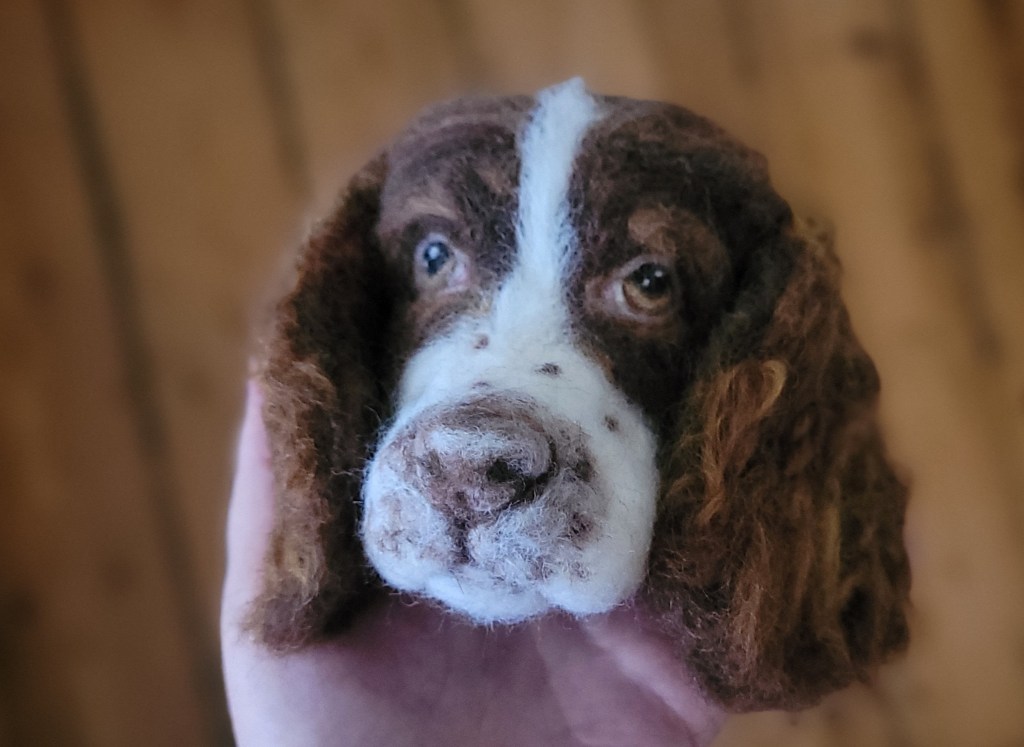
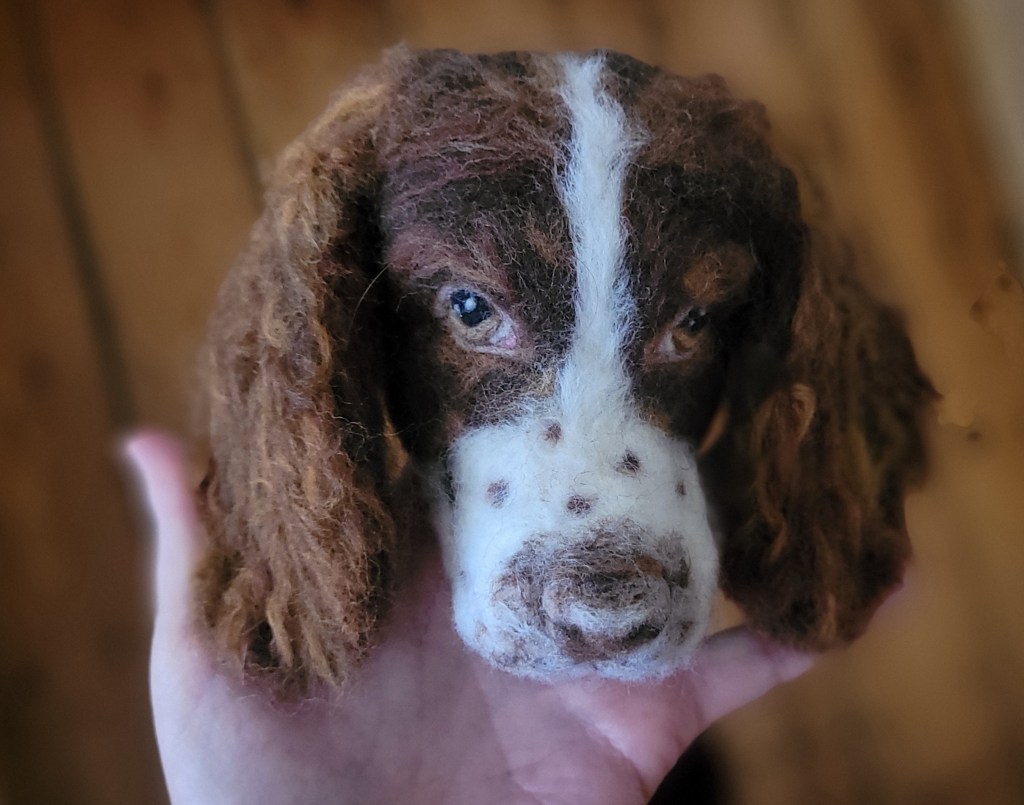
A while back I needle felted the head of one of my favourite breeds of dog, the Springer Spaniel. I was so pleased with how he ended up and he has since featured in quite a few of my Youtube tutorials including ‘How to make Realistic Needle Felted Dog Eyes’ and ‘How to Needle Felt Wavy/Curly fur’. I am sure you may have seen this loveable floppy eared pooch by now 🙂
Well, he is now available to a good forever home!!
He will come as a head and shoulders portrait in a frame so you can put him on your wall or on a shelf.
As his new owner you will be able to name him and decide on the colour of his soft material collar and whether you would prefer a light or dark frame for him.
Maybe you love spaniels or have a friend or family member who loves them as much as I do and would love to provide a new home for him. I will really miss seeing those big soppy eyes around the place but I just don’t have the space to keep all my felted animals long term.
(Once payment has been processed through my Etsy Shop I will contact you by email to request his name, collar and frame colour and to arrange delivery. Please allow up to 10 days for me to complete his shoulders, collar and to frame him).
If you have any questions please email me at fittobeloved@mail.com.
As with all my needle felted animals he is not a toy but a wool sculpture to be admired and cherished. So please don’t pull at his ‘fur’, get him wet or try to brush him. Please keep him somewhere safe and away from pets and small children. Thank you
So today I thought I’d answer a common question that I get asked a lot- “if I’m needle felting a long furred animal, how do I stop all of these lovely, luscious fibres from getting all matted, flattened, tangled and just looking a complete mess?”
As you’re working on an animal, like this guinea pig I am making here, at some point you may have to turn it over or on its side.
Some of it will get fluffed up a little bit and that’s just the big challenge with felting very long fibres like this, but you can eliminate some of the issues with my three tips!
Please feel free to comment and say what you do about this because that would be really helpful to share tips and ideas with each other as well.
3 Tips to help prevent over felting, matting, frizzing, of long animal fur
(Scroll to the bottom if you’d like to watch my video version)
PLAN AHEAD
For an animal that’s upright I try to always start adding wool on the underside i.e it’s tummy and legs first so that I’m not having to turn over the lovely top layer. If I start off with the underside, that’s the bit that you’re less likely to see so if it gets a bit flattened it doesn’t matter so much.
I then turn it over and work on the top side and that’s the bit you’re mostly going to see. So you’re not going to be laying it down on all the lovely fibres and squishing them. The moment you turn your animal over, it’s going to flatten and potentially fluff up or leave the fibres looking frizzy and it’s just not going to look so great like how you added it in the first place.
CONSIDER WOOL TYPE
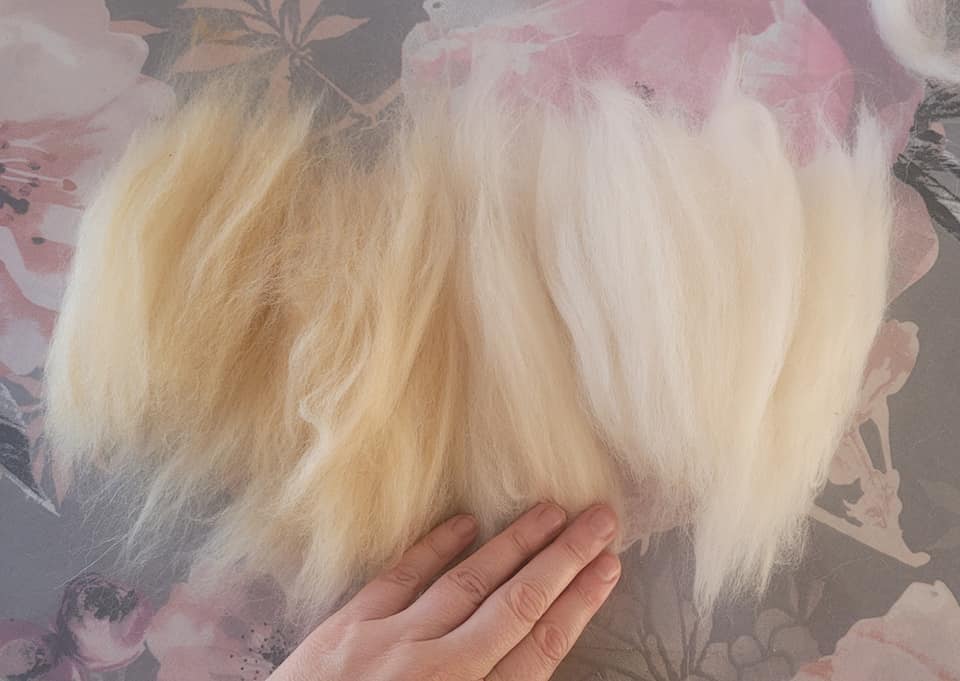
Think about the kind of wool that you’re going to be using.
So a lot of us will use merino wool tops for long fur. These are great because they’re really well priced. They come in the kits and you can get loads of different colours. I love the range of colours for needle felted animals here.
However you do need to think about the way that the fibres lay and the way they can potentially matt and frizz up easily.
I have been trying some other kinds of fibres recently. One I want to mention is alpaca wool (you can get some lovely alpaca tops here) and suri alpaca. They seem a lot finer and softer, but you will notice a silky like consistency to them.
So I’ve been mixing these (hand blending) with my other fibres and finding that the mix is less likely to frizz and tangle with a silkier result.
Your animal fur can still end up flattening if you’re not planning your animal properly, but generally I’m finding that I can achieve a more natural looking fur as well as it matting less. It’s a beautiful, beautiful fibre to work with!
If you’re using a coarser natural wool top, such as a corriedale top. This is brilliant for replicating a coarse rough looking kind of animal hair rather than one that is smooth and soft looking.
You can incorporate that into your animal fur look as well. I used this in some of the brown shades on my sheltie for example.
The only thing with it is that it is rougher in texture and so tends to felt a lot quicker. I find it’s tougher and not so soft and fine. But at the same time if you rub it against anything that is also rough, the friction will make it end up looking frizzy which may not be the look you were hoping for..
So think about the kind of wools that you might want to use. Try out a variety of fibres…
A ‘GLIDEY’ SURFACE
Think about what surface you’re working on. A lot of us will be using something like a felting mat or pad. My Eco felting mat from Heidifeathers has a really nice consistency and firmness to felt on. I can do all my core work sculpting on there really well and also add shorter fur fibres.
But when I come to attach my long fur, the last thing I want to do is allow my fibres to rub against the felting mat material and felt my fibres a lot further. I want them to end up looking really lovely on the animal. I don’t want them to rough up and get tangled.
So when you’re thinking about what you’re working on, think about something that is not going to be fraying your felted animal fur.
Once I’ve made the core animal shape base, I often move it off of my felting pad and I will use a slippery surface for the majority of my time…you’ll often see me use the inside of one of my beautiful storage box lids.
This allows my piece of work and the fibres to glide against it and not rough up and felt. It might move around a little bit but because my animal is contained in the lid area, it’s not going to slip too far. You don’t need to use a felting pad because the needle is not going to go through and stab into my knee or anything. Much of what I am felting onto is the thick body of the animal and as long as I don’t felt too deeply the hard surface is fine.
If I want to get at an angle though e.g. side of tummy, under a neck or felting fur on a leg I can still use the felting pad but lay a material over it.
A shiny smooth material like satin or silk is really good though test it out and see what you think. You don’t want to get too much static adding to your issues so trial it. You could get a bit of this material to lay over the pad. Tightly wrap it if you can so it doesn’t slip as you felt or buy a purpose made satin or silk surfaced pillow.
Or use a plastic bag or sheeting over the pad (I simply use the flat slippery bags that my wool come in). It can slide a little but that’s fine.
A shiny paper like tissue papers or wrapping paper or card can also work but less likely to last as long potentially.
The felting needle can enter the material a little but that’s ok.
If adding long fur to a thin piece of the animal anatomy e.g an ear or tail I would rather go back to just using my felting pad and just be very careful about not messing up the fibres.
Try a few options to see what works for you and find out what is most effective and comfortable for the process.
Whatever surface you choose, lay the animal down carefully against the surface before stabbing and ideally lay fibres in the way they should flow so they are less likely to fray at the ends or flatten or frizz from laying the wrong way.
A few extra tips
Remember to make sure that you’re not constantly touching or pulling at the fibres. Make sure you aren’t using greasy fingers of any sort, and that you’ve washed your hands really well and you’ve got no extra oils in your skin when you need to touch them.
For particularly long pieces of fur you can twist the ends carefully and tuck them down before laying your animal down when you’re working on it to prevent the ends from being vulnerable to fluffing or fraying.
To finish off your animal so it has beautiful fibres
Once you have added all the fur to your needle felted animal you can then revive the fibres if they have become a bit flat or disheveled and plump them up.
Depending on the wool you have used and how you want the fur to look you could carefully brush them with an eyebrow brush or similar brush. For many of my animals however a brush can be too much for the delicate fibres and I don’t want to break or pull out the fibres I have taken my time to add and so I simply use a clean finger and thumb to tease fibres in the direction I want them to go and to unflatten them.
A normal sewing needle or sometimes my barbed needle is also a perfect tool to manipulate the fibres and to separate them out so they still look like realistic animal fur. Then a final trim with scissors if needing to tidy or remove any excess fluff!
I hope these tips have been helpful. Let me know your thoughts on them. 😊
Here is a video version if you prefer to watch or listen: How to protect long wool fibres while needle felting animals.
Please let me know what you do to help protect your long fibres, I’d love to hear your hints and tips too 🙂
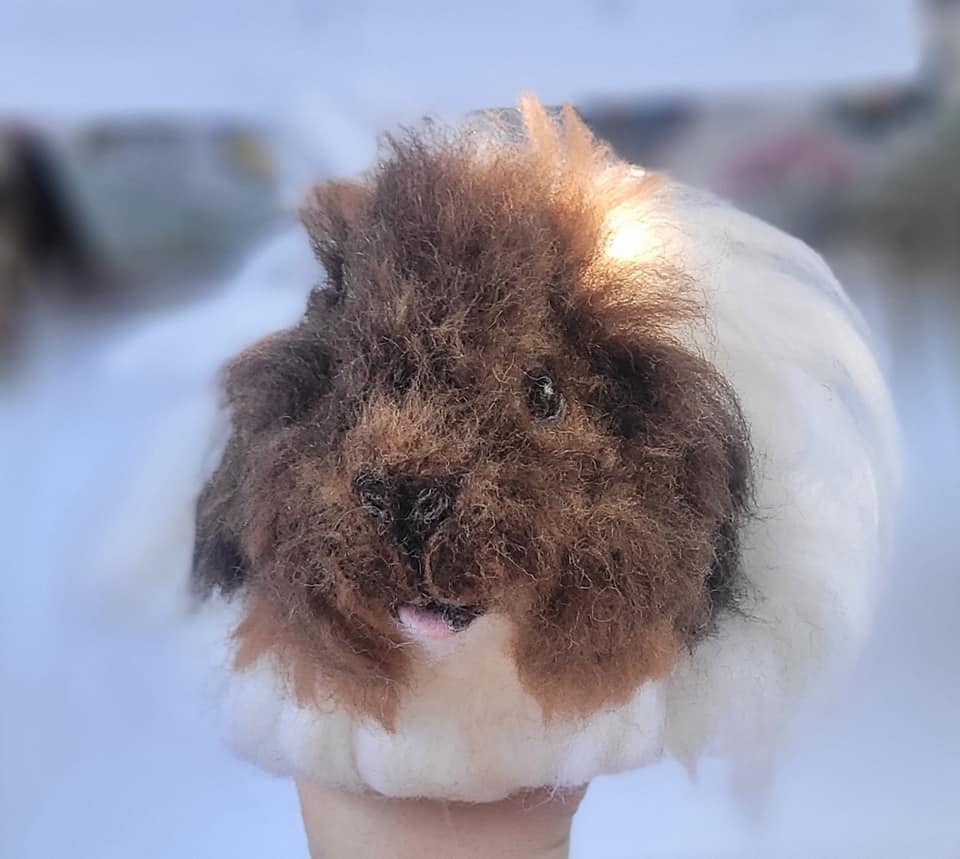
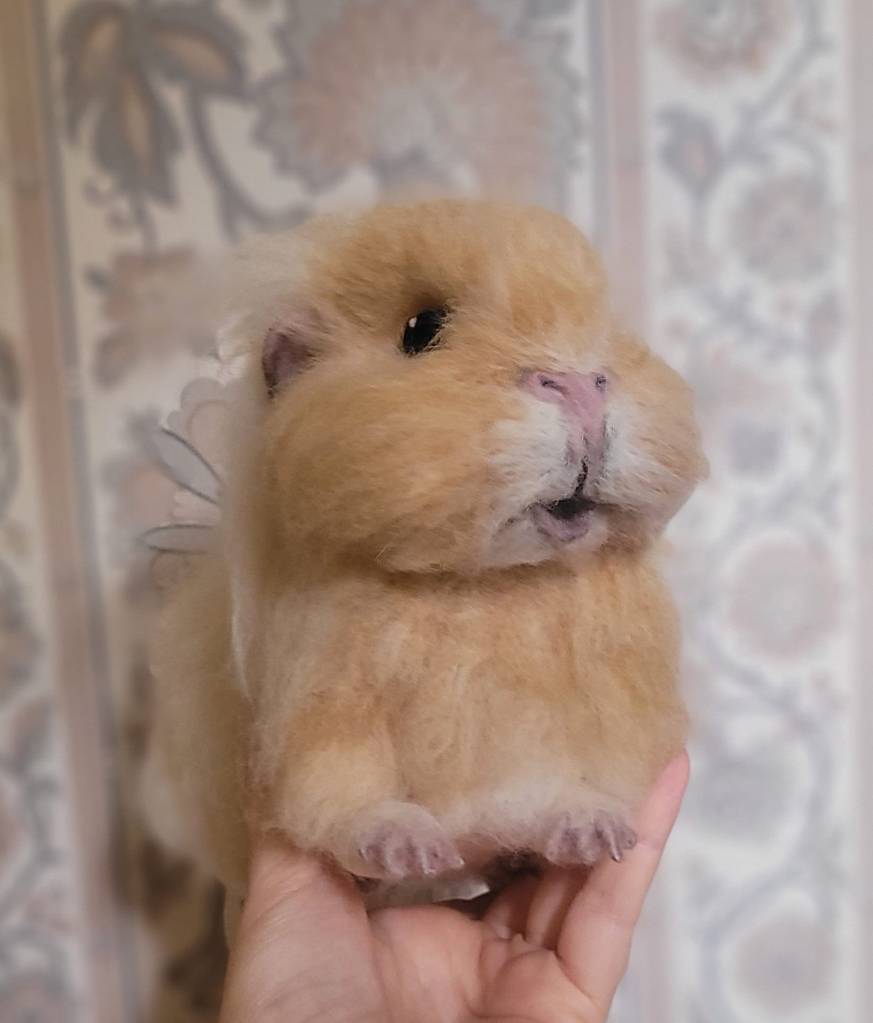
I recently had the privilege of needle felting a guinea pig in memory of a beautiful real one called Ralph.
I made his basic shape from core wool, made some cute little feet by wrapping wool over wire and then added long fur which was a mix of merino tops and baby alpaca tops. Wow you should feel those baby alpaca fibres, they are so soft and slightly silky to the touch. I really enjoyed working with them.
His colours were not the easiest to replicate as in some lights he looked more of a peachy colour and in others he looked more like a light mustard colour but I’m quite pleased with the outcome. He has some beautiful tones don’t you think?
His eyes, ears, nose and mouth are all wool too!
As with all my creations I really tried to add as much detail as possible and to get him looking as realistic as I could.
The main aim with pet sculptures is to capture the character of the real one. The real Ralph had the most gorgeous smiley mouth and a sparkle in his eye
I’m so pleased his new mummy loves him and though of course the real Ralph can’t be replaced I hope this wool version will bring some comfort 🙂
I hope you like him.
If you would like to know how I needle felted his sweet feet you may like to watch this video of how l needle felt rodent feet, there’s a demo of a guinea pig foot, a rat foot and a mouse foot too! Enjoy 🙂
‘How can I make cute paws for my needle felted animals?’
Here is a quick and easy needle felting for beginners video tutorial.
You too can make simple felted animal feet.
I demonstrate how to needle felt kitten paws but this can be adapted for many other needle felted animals for example a puppy, badger, hamster, bear etc.
There is no need here for a wire, you just need your wool and needles!
In this tutorial I create the simple back foot shape from core wool, cover it with soft merino tops, then use my twisted needle to smooth the surface.
Next I add some black lines to define individual toes, add some cute pink paw pads (or toe beans as I like to call them)
and also give recommendation for how you would attach your animal feet.
So let’s jump to the needle felting paws/feet tutorial. 🙂
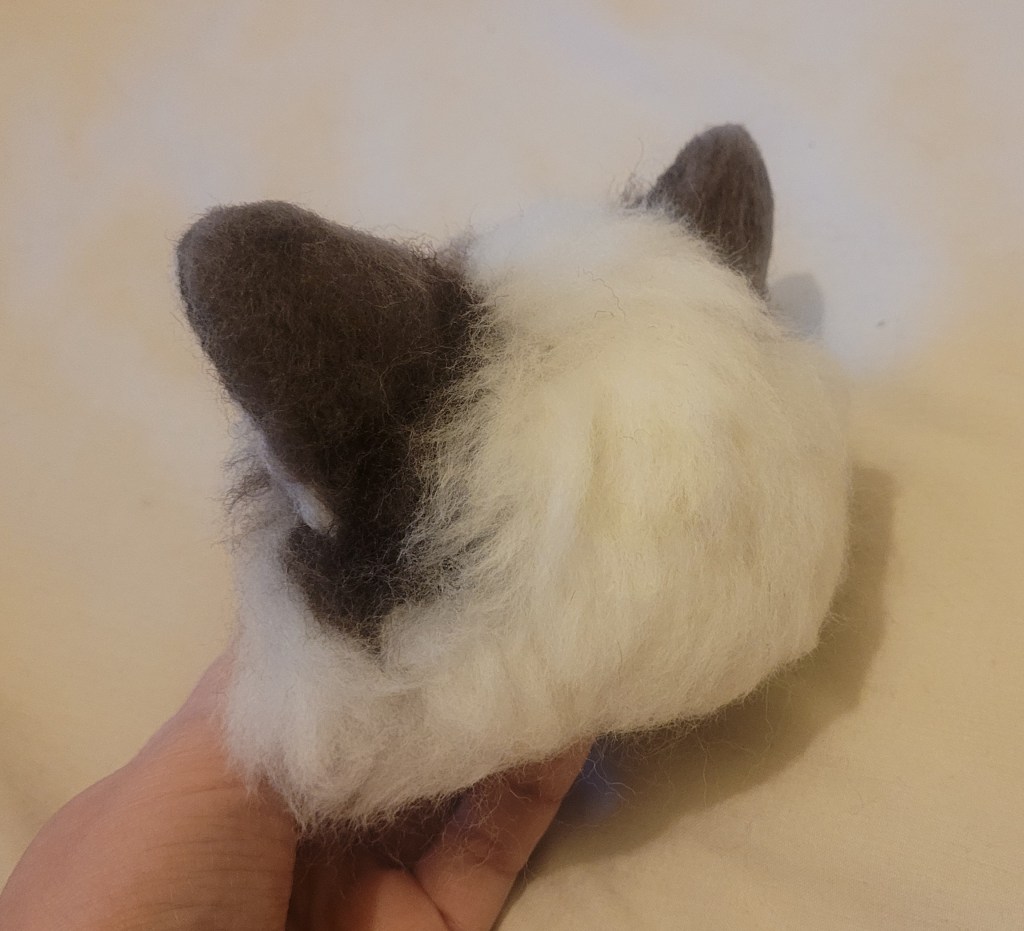
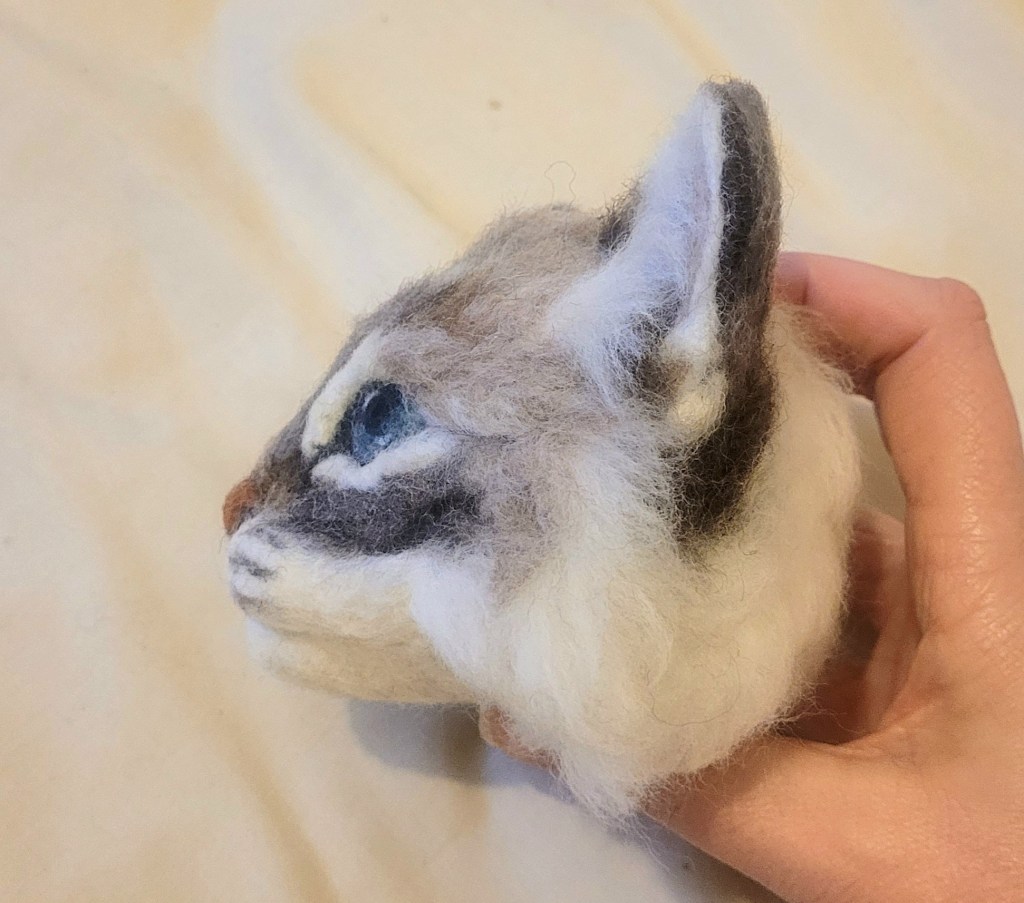
How do I needle felt realistic cat ears? What’s a Henry’s pocket? How do I add ear hairs?
These are the questions you might ask yourself, though maybe you have seen that interesting looking crevice/pouch on the side of a cat’s ear but not realised it was called a Henry’s pocket…hehe I didn’t know this until I studied the ears in detail when making my Tabby Birman cat 🙂 such a cute name for it don’t you think?
So here is my Needle Felting Cat Ears tutorial that will show you how to make cat ears from wool that are realistic and detailed and I’ll hopefully answer those questions more fully..
There are 12 steps including the basic ear shape, adding some inner ear colour, 2 methods for the fluffy fur on the back of the ears, how to create a Henry’s pocket, making the ears thin, attaching to the head and I reveal a special technique at the end on those cat ear hairs…. The end result will be some gorgeous cat ears! Will you have a go?
I hope you enjoy it as much as I thoroughly enjoyed making the ears and presenting them to you in this video.
Needle Felting Cat Ears Tutorial
This is part four in the needle felted cat head series so if you’ve missed any of the previous parts you can view them at the links below.
Tutorial one for Needle Felting a Cat Head Shape is here
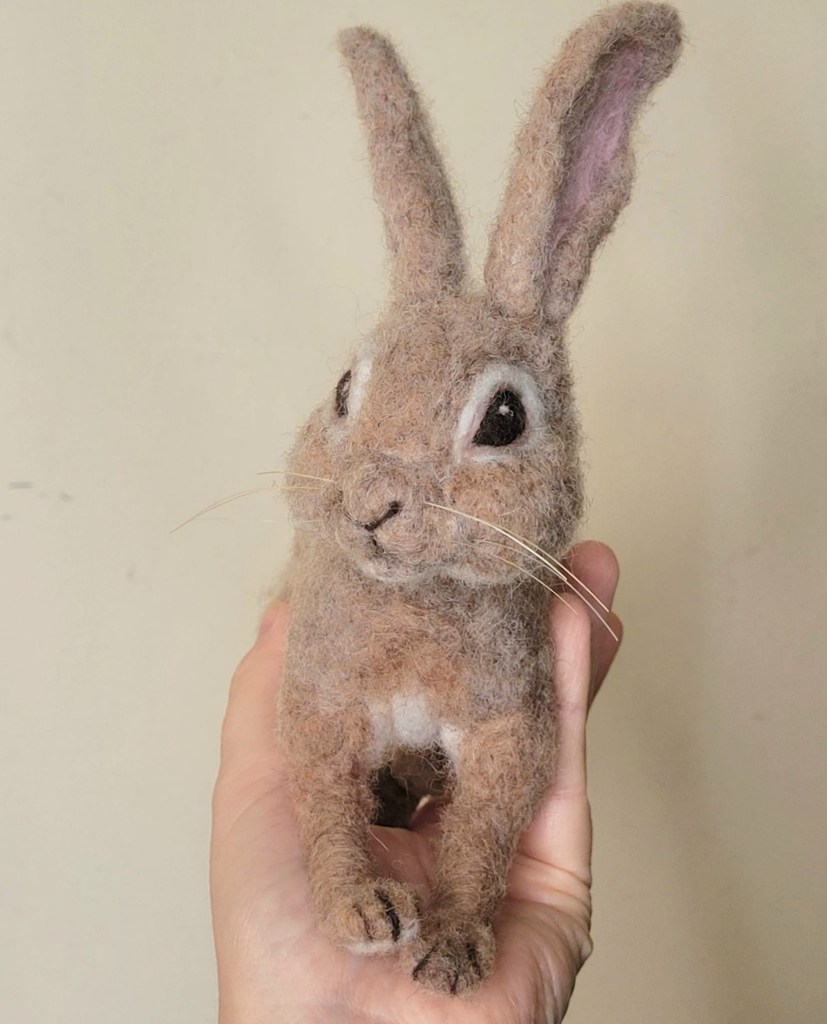
It’s wonderful how some wool and pipe cleaners can be transformed into a realistic needle felted bunny sculpture with just a little imagination, prodding effort and time!
I’ve made bunnies before but not a wild looking one. I chose some beautiful wools – carded slivers from themenagerie range at Heidifeathers. The main colour is called ‘rabbit’, the darker shade is ‘deer’ and the white is ‘polar bear white’. They were soft and easy to wrap, felt and blend.
Here is a time lapse tutorial that shows you the entire process and demonstrates the steps you need to make your own cute wild rabbit. The video includes pipe cleaner armature, wrapping wool, adding wool shapes to build the body, making paws, creating a head with face detail, adding wool eyes and lovely long bunny ears, attaching the ears and head, making a cute fluffy tail, reverse felting for fluffy fur, adding a darker shade for more realism and adding horsehair whiskers.
Would you like to know how I needle felted the long fur on my Tabby Birman cat?
Here is a video tutorial with techniques of how to blend wool colours, plant (attach) long fur to your cat head, layer the wool pieces, reverse felt wool in some areas (for blending, gradients and fluffy fur), create tabby marking patterns and trim wool.
It’s great if you would like to make realistic cat fur!
This is part 3 of 5 in my series of Needle Felted Cat Head tutorials.
I hope you enjoy it
Here is the next tutorial for making the cat ears.
Or if you would like to know how to do the whiskers then that part is here.
If you missed the previous 2 videos or would like to rewatch them:
Tutorial one for Needle Felting a Cat Head Shape is here.
Have you ever wondered when to use a wire armature? or been confused as to what size wire to use? Maybe you are wanting to know what wool and needles are best for armature making?
In this video, the Complete Beginner’s Guide to using Wire Armature for Realistic Needle Felted Animals, I show you the tools and materials I use when making a wire armature and answer these common questions and more.
This tutorial is packed full of useful tips and includes 5 demos – Bunny & Fox armatures plus tiny rodent feet (guinea pig, rat and mouse)!
Heidifeathers have kindly sponsored the video. Get a 10% discount at their International online shop at https://www.heidifeathers.com using code Felting10 (first 50 customers only – so be sure to go there as soon as you can and don’t miss out!)
They have a wonderful range of wool, wire and tools, pretty much everything you’ll need for needle felting realistic animals. I use their wire, pipe cleaners, needles, wool, pliers, felting mat and horse hair in my video and I thoroughly recommend them if you’d like to get started!
Complete Beginner’s Guide to WIRE ARMATURE for Realistic Needle Felted Animals
I hope you enjoy the video! Let me know in the comments what animal you might like to make first with a wire armature 🙂
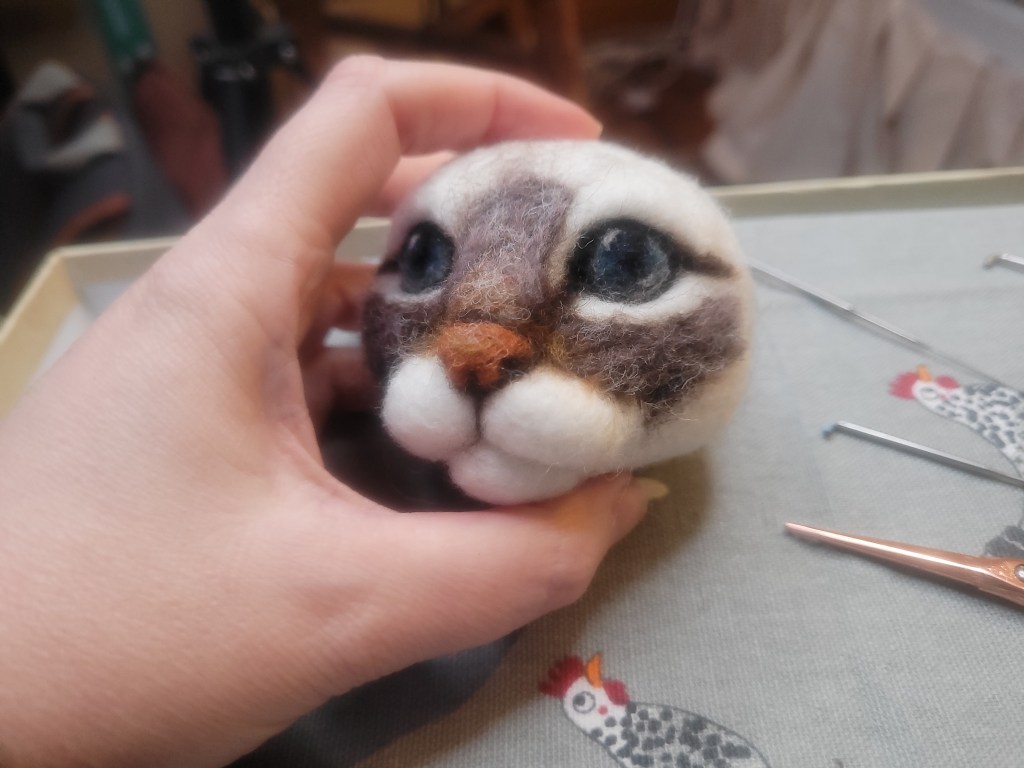
Are you needle felting a cat with short fur? or a long haired cat that has shorter furred areas?
This is part two in my series of Needle Felted Cat Head tutorials as demonstrated on a Tabby Birman sculpture!
I’ll teach you how to blend colours by layering wool and reverse felting. There’s also some planting of longer strands and trimming…
You’ll be adding short fur to the bridge of the nose, the cheeks, whisker pads, chin and around the eyes. I’ll also share my technique for whisker dots
So here is the video on needle felting short fur:
The next part (three) for needle felting long fur on your cat is here.
I’ve found that Needle felting a cat head really doesn’t need to be hard if you break it down into stages, have a plan and are patient with yourself and the process.
Following on from the time lapse video of the cat head process, this is Part One in the series of actual tutorials. Here I slow the footage down and demonstrate how I Needle Felted the ‘Cat Head Shape’ from core wool.
You are just 10 steps away from creating your own!. I hope you enjoy it!
Needle felted cat head tutorial
The next two videos in this series are available now too if you’d like to watch them:
Needle felting a cat head doesn’t need to be hard. Does it? ……no…..It just takes a little practice and patience
Here I reveal the amazing process of creating a needle felted cat head.
I videoed how I made the tabby Birman cat head for my cat head tutorials but as I’ve been poorly and my throat far too sore to record any instructions I thought I’d initially create a time lapse of all the footage. Hours of needle felting sped up to less than 14 minutes!
I don’t know about you but I found it quite fun and relaxing to watch it all back! I hope you enjoy seeing the process and I hope it inspires you to have a stab at making your own cat
So here is the needle felted cat head time lapse 🙂
Once my throat was better I started to make the actual tutorials where I slow it all down with full instructions.
So here are the tutorials so far:
Tutorial one for making the cat head shape is here.
Would you like to know how to needle felt cat eyes that are detailed and realistic?
This is the second in the series of my Needle Felted Eyes Tutorials following on from tutorial 1 on dog eyes.
It has everything you’ll need for planning and creating wool eyes for a cat.
I’ll first teach you the theory – eye size and position, eye anatomy, eye colours, eye shape and pupil dilation, before then demonstrating how to needle felt eyes on my latest Tabby Birman cat pictured here.
If you have never tried to needle felt cat eyes before or weren’t too happy when you did try then I encourage you to have a go, follow the steps in this tutorial, experiment and see what you think. .
If you already needle felted eyes before then I hope there is something in my video that will inspire you further.
Oh and beware of cute kitty footage along the way 🙂
Thanks for watching 🙂
What kind of cat eyes do you think you’ll have a stab at?
If you would like to know how I needle felted the cat head, made the ears, added the fur etc then these videos are here.
You can use it to make fluffy fur, BUT there’s so MUCH MORE you can do with it too!
This video is your Ultimate Guide to the reverse felting needle.
In this needle felting tutorial I’ll show you what it is, what it can do. I’ll share top tips for how to get the most out of it and there may be some techniques you have never thought about!
I hope you enjoy it!
Please let me know what you might try to create with the reverse needle in the comments 🙂
The Reverse Felting Needle is a wonderful versatile tool and one of my all time favourite needles.
I get my needles from HeidiFeathers, they are brilliant in quality and all colour coded so you don’t lose track of which needle you are using! They deliver internationally and sell a variety of tools and fibres.
If you are starting out and don’t have any needles yet then it’s well worth getting a set of 30 Mixed Felting Needles – 10 Different types – Triangular, Star, Reverse & Twisted Needles https://amzn.to/3oSks9j
Or if you are looking to get individual needles then you can choose by needle type:
Needle Holders – why would I use one? what do they do? and which should I get?
Here’s a quick overview for you about them with a few recommendations from my own experience. Please do let me know if you have any questions 🙂
SINGLE NEEDLE HOLDERS
You can just simply hold a needle between your fingers and thumb and stab away for hours sculpting your wool, but it can get a little uncomfortable after a while. So it is well worth getting a needle holder which has been designed and shaped for you to grip it easily and with more comfort.
You may only need the one, especially if you have a favourite go-to needle (for example I love the 38G star needle and can pretty much do most if not all of an animal with that one needle), but as you experiment and come to like other needles too for the different stages of your piece you may want to buy a few holders.
I think it’s a good idea to buy a set (which works out cheaper per holder) so you don’t have to keep changing the needle in the holder each time you swap to a new one.
There’s so many holders out there to choose from. You can buy wooden ones, rubber moulded ones, plastic ones, or you can even make your own if you wanted to.
Keeping your needle in a holder can make the needle last longer especially if it’s a holder where you can insert the needle the other way inside the handle when not in use. Also if your holder is a certain colour or pattern which is different from the others you’ll hopefully not forget which needle you are using.
You can keep them plain, or you can varnish, paint or even decorate them with decopatch paper (hmm…that gives me an idea for a future tutorial!).
You can keep the needle inside the handle when not in use for safe keeping or for travelling.
MULTI-NEEDLE HOLDERS
For times when you want to speed things up a bit and hold more than one needle at a time, a multi-needle holder is perfect for this.
My absolute favourite is the Clover Needle Felting Tool. It’s a bit like holding a pen and it has a lid to protect your needles when not in use.
It can hold one to three needles at one time but with 3d animal sculptures I often just like to use two at a time for firming up wool, adding long fur, and attaching limbs.
Clover Needle Felting Tool (click image to buy)
I will use three needles if wanting to make small flat animal features e.g. ears or feathers. Then when I want to really get going at pulling out fibres for a fluffy look, using 2 or 3 reverse needles at a time in my Clover tool really does the job! – have you ever tried it?
If you want to use even more needles for larger flat pieces for example bat wings or when making lots of leaves (I made leaves for a dormouse nest) then I would recommend the Heidifeathers wooden multi-needle tools (there’s a 4 needle handle or a 6 needle handle) or the Clover 5 needle holder. (click the image to purchase)
Wooden 4 Needle Handle
Wooden 6 Needle Handle
Clover 5 Needle Holder
Do you like using needle holders? If so which do you prefer the most?
I have included links for where to source these needle felting tools. Please see Links disclaimer in the right side panel for more details.
Please rate Fit to be Loved on Trustpilot. Your feedback is very much appreciated :-)
Need to contact me?
07793 350882
fittobeloved@mail.com
Links Disclaimer:
My site includes links for where to source needle felting tools and materials. These are my personal recommendations and from my favourite suppliers who I trust and who have excellent reviews. Some are affiliate links so I may receive a small commission at no extra cost to you. This supports my website and enables me to continue to provide valuable content and for that I am so very grateful to you – Thank you!!